Hello, friends! I have been struggling with a lack of mojo for several days, so I figured there was no better time than to pull out this new stamp and die set that I recently purchased from Simon Says Stamp. This Happy Face set is part of their STAMPtember® ’22 release. I made several cards, and although there are many great sentiments in the set, I mainly used the happy face images themselves. I will definitely be using the sentiments in the future, though, especially since I have the matching dies.
Card 1 Supplies
Simon Says Stamp – Happy Faces Stamp Set
Simon Says Stamp – Luminary Circles Die
Pinkfresh Studio – Simply Sentiments – Hello Stamp Set
Simon Says Stamp – Blending Brushes
Neenah 110 lb White Card Stock
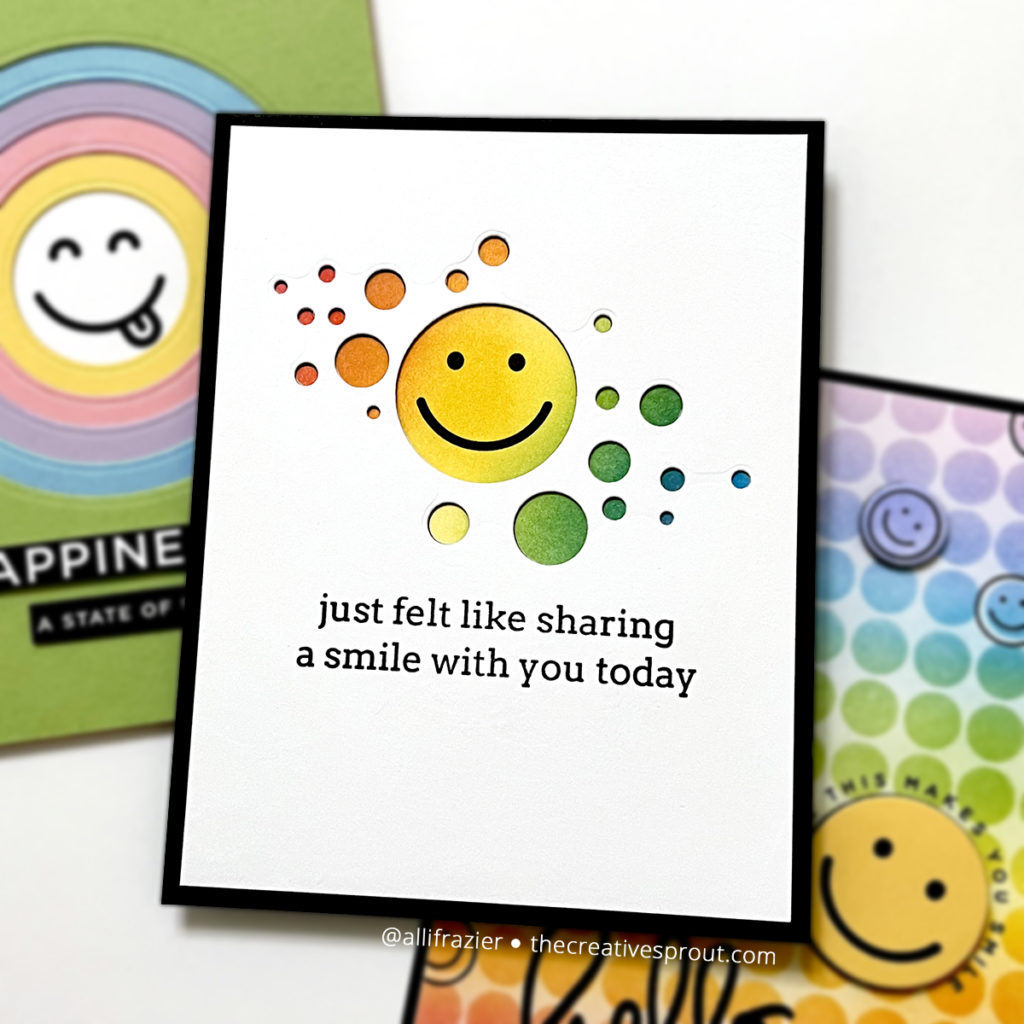
Making the First Card
This first card was super easy to make. I used the Luminary Circles die to cut the circles out of a white piece of card stock measuring 4″x5.25″. I also used the die to cut the holes out of a piece of copy paper. I used the copy paper as a stencil and ink blended Distress Inks over the openings onto another piece of white card stock. I used Festive Berries, Spiced Marmalade, Mustard Seed, Mowed Lawn, and Broken China. I stamped the Happy Face onto the large yellow circle.
To assemble the card, I cut a piece of black card stock using the Luminary Circles die and glued that to the back of the white panel that I had cut the same holes from. I then glued this over the ink blended panel, making sure that everything lined up properly. I adhered these three layers to a black A2 card base. Finally, I stamped the sentiment, which I think is just perfect for this card.

Card 2 Supplies
Simon Says Stamp – Happy Faces Stamp Set
Simon Says Stamp – Happy Faces Die Set
Simon Says Stamp – Small Hello Die
Simon Says Stamp – Bubble Wrap Stencil
The Stamp Market – You’ve Got Mail Stamp Set
Hero Arts – Circle Infinity Dies
Simon Says Stamp – Blending Brushes
Making the Second Card
My second card took the most time to make out of the three, but it was still a really easy card to make. I started with a panel of white card stock and ink blended Distress Inks using the Bubble Wrap Stencil. I used the same rainbow set of colors that I used on the first card, but I also added Shaded Lilac. Once I was done with the stencil, I took my blending brushes and very lightly blended the same colors over the panel again – this minimizes the sharp contrast of the colors against a white background. I took the small happy face stamp and stamped it randomly over some of the colored circles.
I was originally thinking of just leaving it at that and adding a large word die, but I decided to go a bit further. The You’ve Got Mail set from The Stamp Market has some great sentiments, and I thought this one would be the perfect sentiment to go with all of these happy faces. I chose a circle die from my Infinity die set that would nestle in perfectly with the sentiment, and I used that to cut a yellow circle that I then stamped the larger happy face onto.
I adhered the panel to a black card base and popped that larger happy face up on black craft foam. I used the Small Hello die to cut two layers of black card stock and adhered the stacked die to the bottom of the card panel. I also quickly blended some white card stock with my distress ink colors, stamped the small happy face over each color, and used the matching die to cut them out and pop them up on the card panel. I finished the card by adhering several clear sequins to the panel.
Card 3 Supplies
Simon Says Stamp – Happy Faces Stamp Set
Hero Arts – Circle Infinity Dies
Simon Says Stamp – Reverse Happy Sentiment Strips
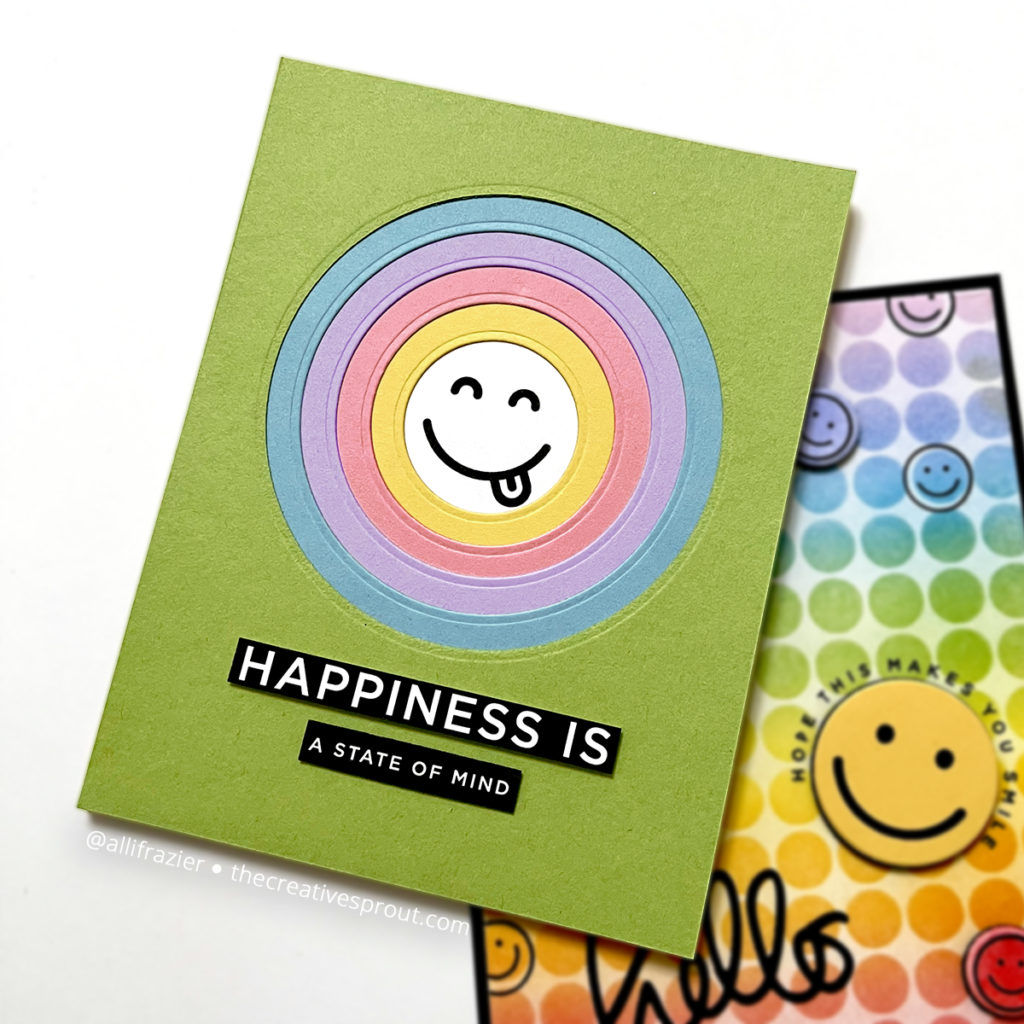
Making the Third Card
I had to use that funny face with the tongue sticking out, so I made this card. I first used a circle die to cut the largest circle in the green A2 sized panel. I used the circle die from my Circle Infinity set that is two sizes smaller to cut the circle in the blue panel. I just held the green panel over the blue panel to make sure my circle was lined up evenly on the blue panel before running it through my die cutting machine. And I did the same for the other colors, always using the circle that was two sizes smaller than the last.
I lined up the yellow panel over a white A2 card base so that I could stamp the smiley face in the correct position, and then I adhered all of the layers together. The sentiment strips come from the Reverse Happy Sentiment Strips set, which has a lot of great sentiments for this Happy Face set. I love having these ready-to-go sentiments as an option – the only thing I have to do is trim them with my paper trimmer and run a black marker around the edges to hide the white core.
That’s it for my cards today. I hope all of these smiley faces put an even bigger smile on your face! Thank you so much for visiting my blog today.
Wishing you all a crafty day,
Allison
Note: External links on my blog may contain affiliate links. This gives me the opportunity to earn a small commission when you click on the links and place an order. This comes at no additional cost to you. Thank you so much for your support, as this helps me bring you more content.