Hello, friends! I hope you’re all doing well. The Spellbinders Monthly Clubs are here, and it’s time for new members to sign up. Spellbinders is celebrating Christmas in July all month long, and these club kits are an amazing start. Remember that one of the major benefits of the Spellbinders clubs is that you can cancel at any time and rejoin if/when you want (assuming there is enough inventory when you want to rejoin).
I have a new video up today on YouTube with the cards that I made using the Small Die of the Month and the 3D Embossing Folder of the Month. And, something new for me this month – the Large Die of the Month! I am so thrilled with how my cards turned out. It’s actually hard not to love anything made with these products. You can CLICK HERE to view on YouTube or just watch it below.
Note: all supplies are linked to multiple sources in the thumbnails at the end of this blog post.
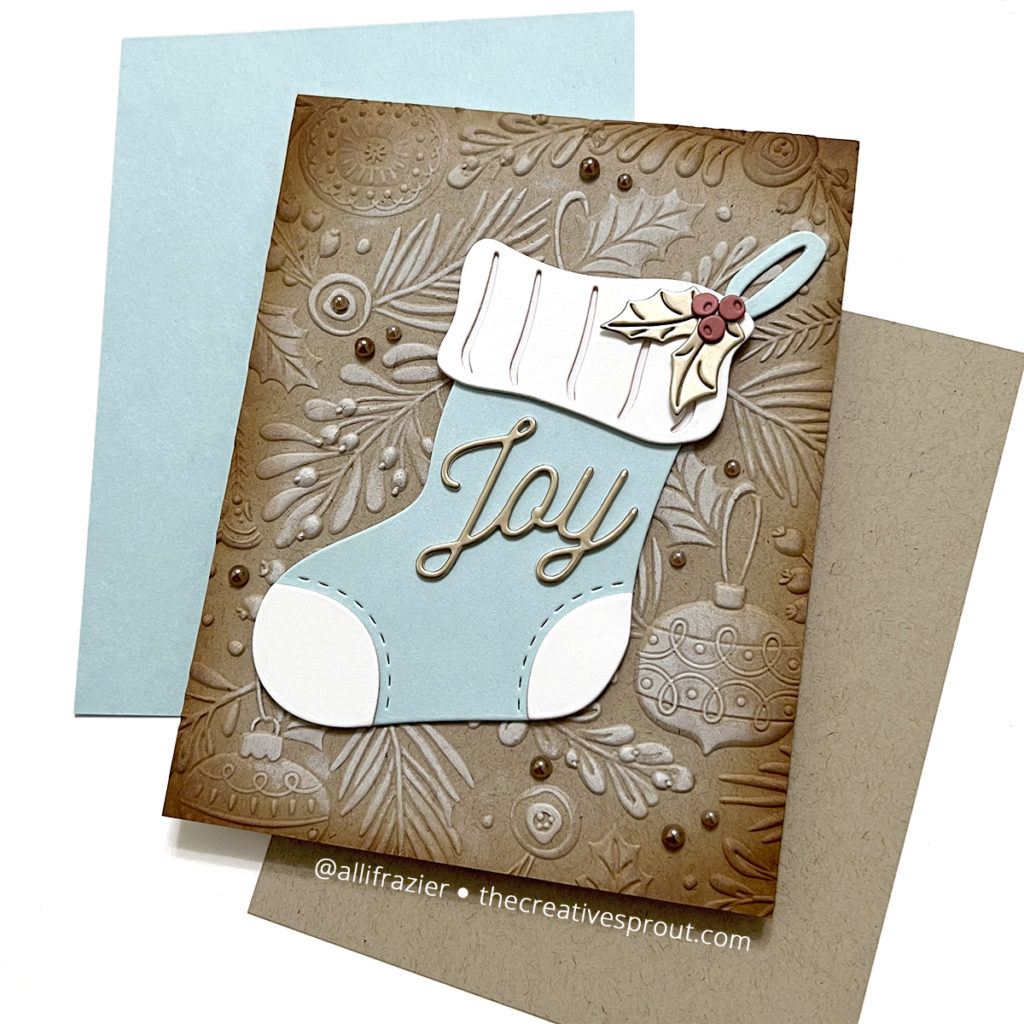
My first card features the July 3D Embossing Folder of the Month, which is called “Adorning the Trees.” I also used the stocking from the Large Die of the Month, which is aptly named “Stocking Full of Joy.” I simply embossed a panel of Kraft card stock with the gorgeous embossing folder and then I used a brayer to highlight the embossed details with white pigment ink. The stocking was very easy to assemble. I used a champagne metallic card stock for the “joy” sentiment and the leaves on the stocking. I embellished the card with my favorite Fashion Taupe pearls, and then I finished by inking up the edges of the card panel with Vintage Photo Distress Ink.
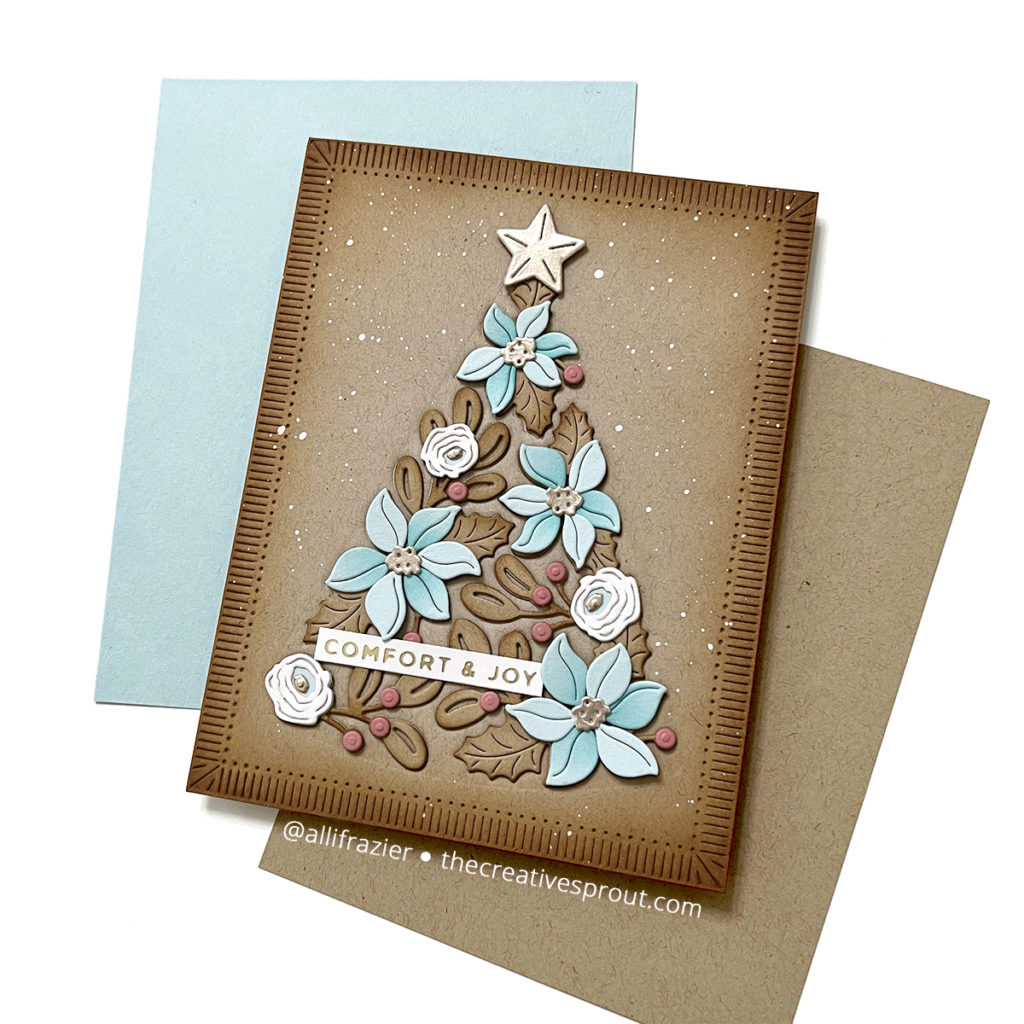
My second card features the Small Die of the Month , which is called “Layered Poinsettia Tree.” I first die cut a panel of Kraft card stock using the Fluted Classics Rectangles Set. I used my Vintage Photo Distress Ink again to ink up the edges of the panel. I embossed the tree die into the center of my card panel using the appropriate sandwich on my Platinum 6 machine. This was to give me a guide for glueing on the layers later in the process. I cut all of the pieces from the die set and assembled them onto my card panel. I used the same light blue and champagne card stocks that I used on my first card. I hot foiled my sentiment using Satin Champagne foil. Finally, I splattered white acrylic paint on the panel, making sure not to splatter the tree. In hindsight, I’m not sure why I didn’t just splatter the tree, too!
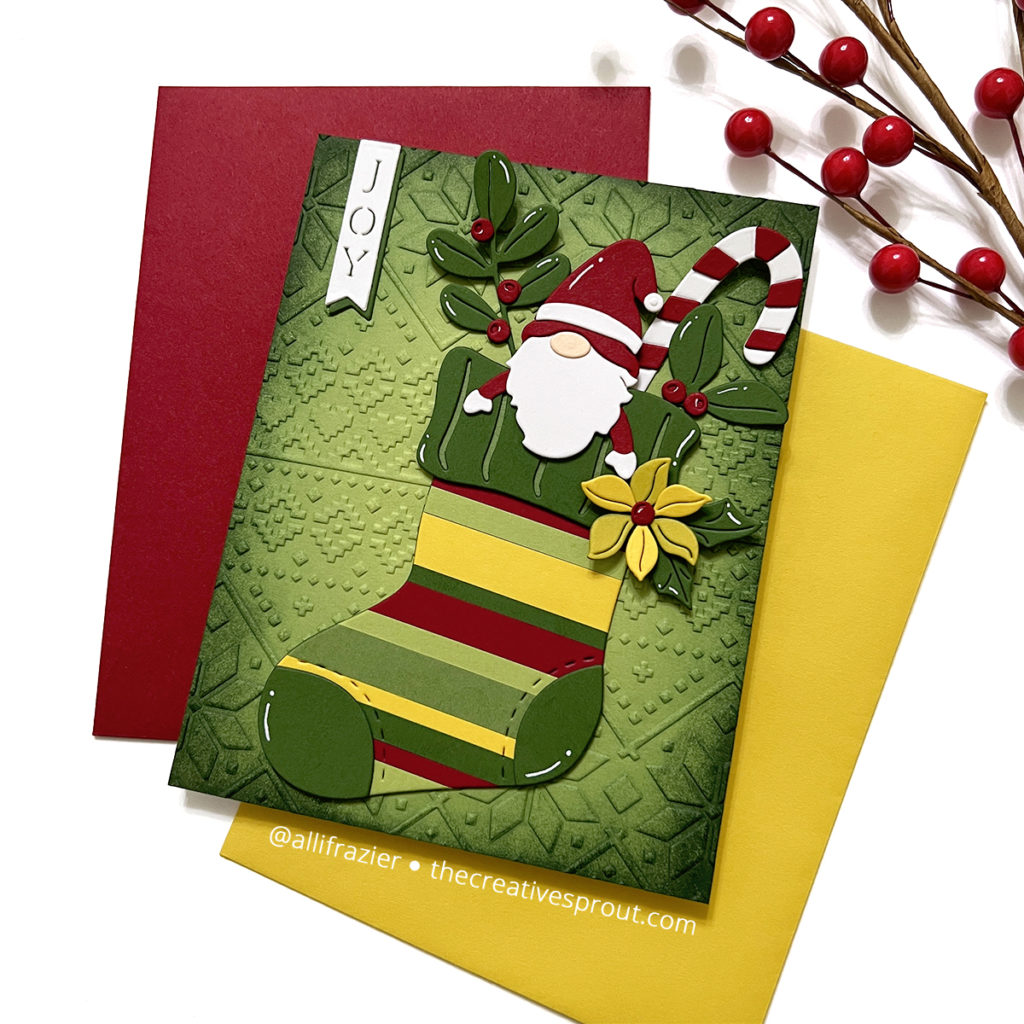
My last card is a bit more playful and features the Large Die of the Month. I’m sure I have mentioned this before, but I love gnomes! So, I had to use this little guy. I started this card by embossing a light green panel of card stock with the Ski Lodge Embossing Folder. Just like my first two cards, I inked up the edges of the card panel in order to create a glow effect in the middle. This time, I used a dark green ink. I glued random widths of colored paper strips onto a scrap piece of copy paper and then ran that through my Platinum 6 with the stocking die. I think the striped stocking is so cute!
I assembled the gnome, greenery and candy cane using the dies from the Large Die of the Month.. The yellow poinsettia and the “joy” sentiment come from the Small Die of the Month. After adhering everything to my card panel, I came in with a white gel pen to add some highlights.
I hope these cards put a smile on your face today. Leave me a comment and let me know which July club kit is your favorite! And, do you like the colorful, playful card or do you like one of the more elegant cards better? Be sure to head over to YouTube to watch my video. I hope to see you there!
Wishing you all a crafty day,
Allison
SUPPLY LIST
Note: External links on my blog may contain affiliate links. This gives me the opportunity to earn a small commission when you click on the links and place an order. This comes at no additional cost to you. Thank you so much for your support! You can see more information on my Affiliate Disclosure page.
Beautiful cards. Just found your blog but always look forward to your youtube videos.
Thank you so much, Sherri. I’m so glad that you’ve been watching my videos – that means a lot to me. Welcome to my blog!
I love all three of these cards! Thank you for the inspiration!!
Thank you so much, Linda! I appreciate you visiting my blog and leaving a comment.
Love the quiet elegance of these cards, and your color combos. So unique & pretty!
Thank you so much, Joan
What a great variety, you’ve been busy!
Thank you so much!