Hello, crafty friends! Spellbinders is celebrating its 20th birthday, and to celebrate, they have released a fabulous collection of birthday themed products. They are currently running a $20 off $100 purchase promotion, so it’s a great time to get your hands on some of these new products! No coupon code is needed, and the promotion runs through June 19th at 11:59 PM MST.
I have a bunch of cards to share with you today, which feature some of the new birthday products. And by the way, both the Platinum 6 and the Glimmer Hot Foil System are also on sale right now. I relied heavily on both of these machines for my cards today.
Card 1 Supplies
Spellbinders – Party Decor dies
Spellbinders – Stylish Script Happy Birthday Hot Foil Plate
Spellbinders – Glimmer Hot Foil System
Spellbinders – Gold Hot Foil Roll
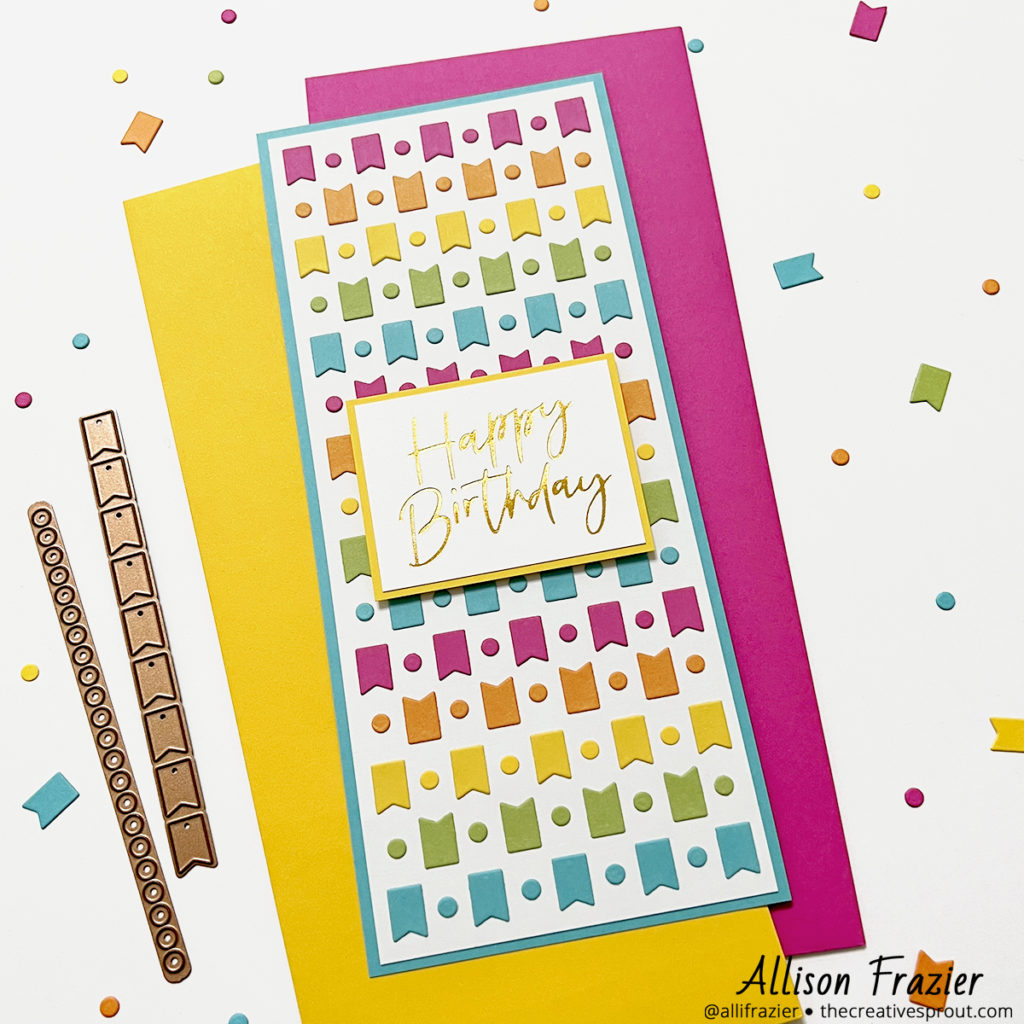
Making the First Card
The new Party Decor die set consists of several dies that cut tiny elements, such as pennants, banners, polka dots, etc. You can make fun strings of banners, or you can just use the elements to make your own design. That’s what I did. I used two of the shapes to make my own slimline sized pattern. After carefully measuring the first two rows, I used a ruler and pencil to plot the layout of the rest of the panel. I really love how the pattern came out. For the hot foiled sentiment, I used gold foil on white card stock, cut it down, and mounted it on yellow card stock. I then mounted the entire panel onto a turquoise slimline card base.

Card 2 Supplies
Spellbinders – Topsy Turvy Cake Dies
Heffy Doodle – Down the Line Stamp Set
Making the Second Card
For this card, I used the fun Topsy Turvy Cake die set. There are so many dies included in this set, providing so many options for decorating your cake. I chose to keep my cake pretty simple, cutting the main pieces out of white card stock, and the icing out of colored card stock. I glued the separate pieces together and then foam-mounted it onto a panel of watercolor paper that I painted with a very soft wash of turquoise paint. I thought the height of the cake would look good with the vertical sentiment. I finished the card with a few white hearts, which were cut using dies from the same cake set.
Card 3 Supplies
Spellbinders – Topsy Turvy Cake Dies
Spellbinders – Loops Embossing Folder
Altenew – Leaf Canopy Stamp Set
Tim Holtz – Distress Oxide Inks
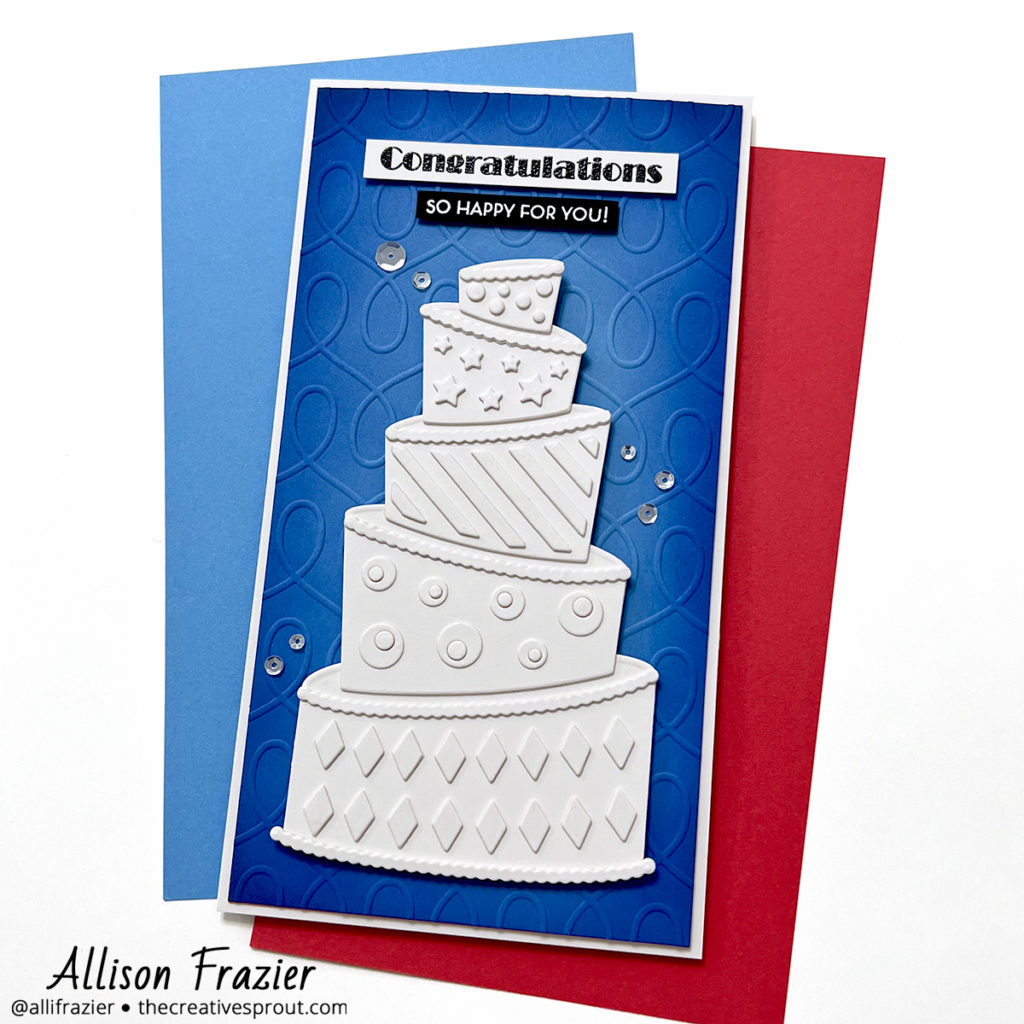
Making the Third Card
For this card, I again kept my cake clean and simple, although it did involve a bit more work. I cut the solid cake shapes from white card stock again. I then cut them a second time, along with the cutout shapes. This second pass gave me not only the pieces that I needed to decorate the cake, but also the template for lining up the pieces on the solid cake shapes. I did cut a second set of shapes so that I could double stack them for dimension.
I love the tone on tone look of this cake. It really reminded me of a wedding cake more than a birthday cake, so I decided to use a different sentiment. Of course, the colors of this card could be for any occasion, like graduation, retirement, etc. I love that this cake can be used for more than just birthdays.
Speaking of colors, I ink blended a blue panel of card stock with darker colors of Distress Oxide Ink around the edges. I used Prize Ribbon and Blueprint Sketch. Once I was done ink blending, I embossed the panel with the Loops Embossing Folder. I mounted the cake onto the panel with foam tape and then adhered the sentiments that I had heat embossed on black and white card stock. I finished the card by scattering some sparkling clear sequins.

Card 4 Supplies
Spellbinders – So Many Candles Glimmer Hot Foil Plate
Spellbinders – Simply Perfect Mix & Match Sentiment Dies
Spellbinders – A2 Matting Basics B Die Set
Spellbinders – Glimmer Hot Foil System
Spellbinders – Rainbow Hot Foil Roll
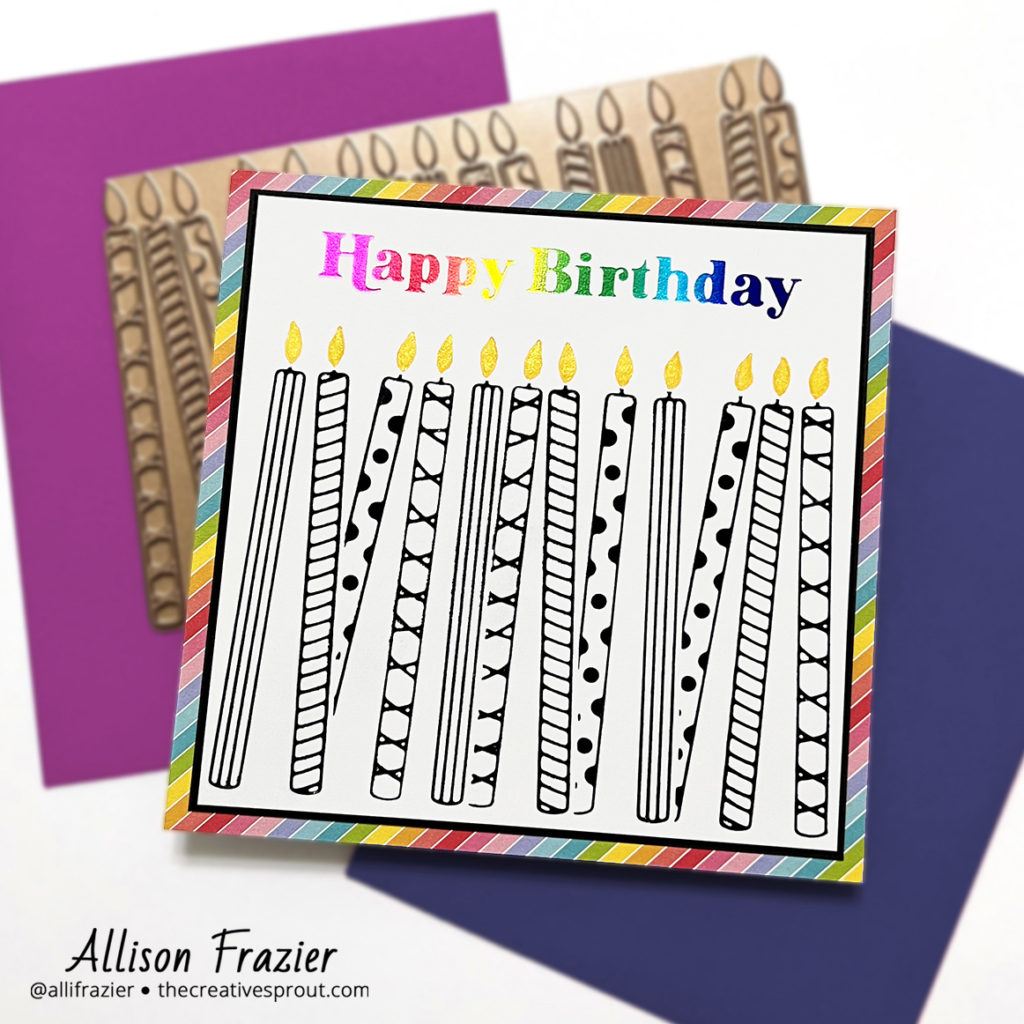
Making the Fourth Card
My next card features this awesome new candles hot foil plate. As soon as I saw this plate, I knew that I wanted to create a shaker card. Shaker cards are so easy to make with hot foil plates because you can hot foil the design right onto the acetate. And it’s even better when you use rainbow hot foil! To make the frame, I just started with an A2 sized panel of teal card stock. I then cut a smaller rectangle out of that panel to create the frame. I popped the frame up on foam tape, scattered some clear sequins into the well, and then attached it to a white card base. Easy peasy!

For the sentiments, I first cut them out of teal card stock and then out of white card stock. I layered the white words on top of the teal, slightly offsetting them to create a shadow.
Card 5 Supplies
Spellbinders – So Many Candles Glimmer Hot Foil Plate
Spellbinders – Essential Glimmer Sentiments Hot Foil Plates
Spellbinders – Rainbow Hot Foil Roll
Spellbinders – Glimmer Hot Foil System
Spellbinders – Black Hot Foil Roll
Tonic – Midas Touch Aqua Shimmer Pen
Making the Fifth Card
I loved this candle hot foil plate so much that I wanted to make another card. This time I foiled it with black foil onto white card stock. It’s hard to see the shine of the black foil in the picture, but it’s there! What you CAN see is the really cool look of the rainbow foil on the sentiment. I just really love this rainbow foil.
You’ll notice that the flames on my candles are not black. That is because I intentionally placed the black foil over the candles only. When you run the hot foil plate through the die cutting machine, it does create a slight impression of the flames. This allowed me to easily color them in with some yellow Copic markers and then add some gold shine with my shimmer pen. To play up the colors in the sentiment, I mounted the panel onto a colorful piece of patterned paper from my stash.
That’s it for my cards today! I hope they put a smile on your face. Leave a comment to let me know which card is your favorite. As always, thank you for visiting.
Wishing you all a crafty day,
Allison
Note: External links on my blog may contain affiliate links. This gives me the opportunity to earn a small commission when you click on the links and place an order. This comes at no additional cost to you. Thank you so much for your support, as this helps me bring you more content.