Hello, crafty friends! I am very excited to be joining Simon Says Stamp for Day 1 of the Happy Camper Release Blog Hop!
Promotion
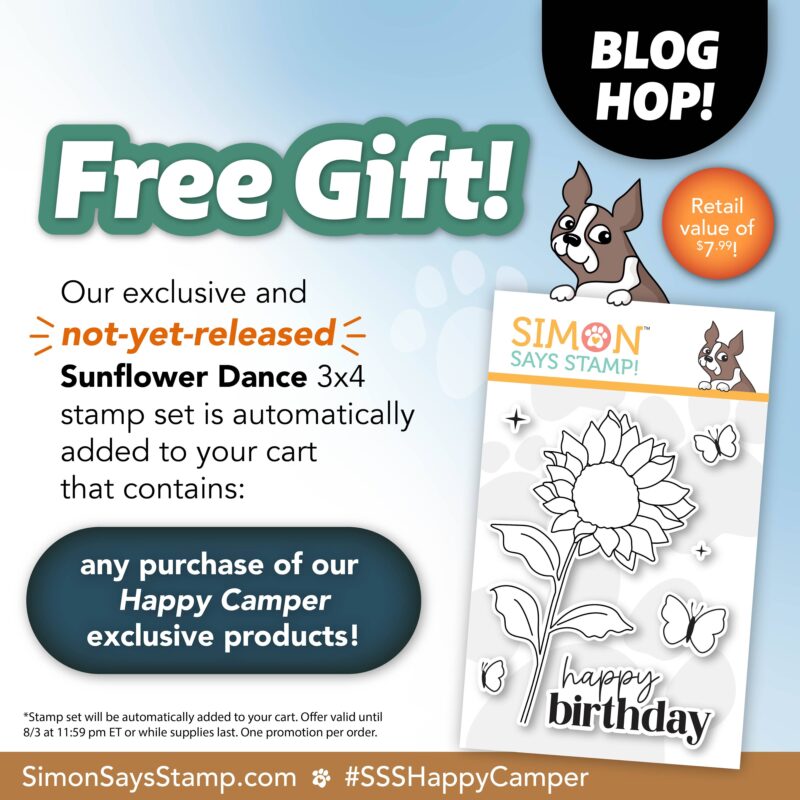
As you can see in the graphic above, Simon Says Stamp is offering their “Sunflower Dance” stamp set FREE when you purchase any products from the Happy Camper Release. This promotion expires on 8/3/25 at 11:59 pm ET, or while supplies last.
Giveaway
Simon Says Stamp is giving away a $25 coupon to every stop on the hop – woohoo! Leave me a comment for your chance to win. Winners will be posted on the Simon Says Stamp blog on Wednesday, August 6th.
Galleries
When you’re finished hopping, and you’re looking for more inspiration, check out the Happy Camper Gallery on the Simon Says Stamp blog. There are galleries for each release, and we encourage you to share your creations there, as well!
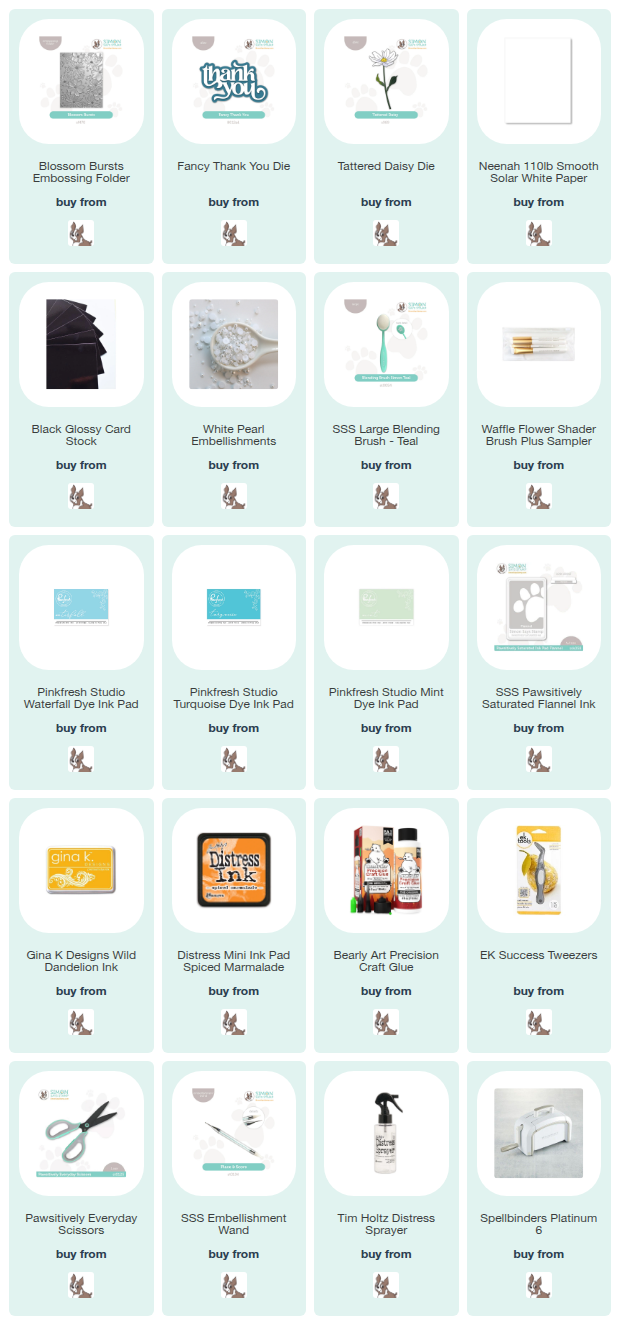
Note: all supplies are linked in the thumbnails at the end of this blog post.
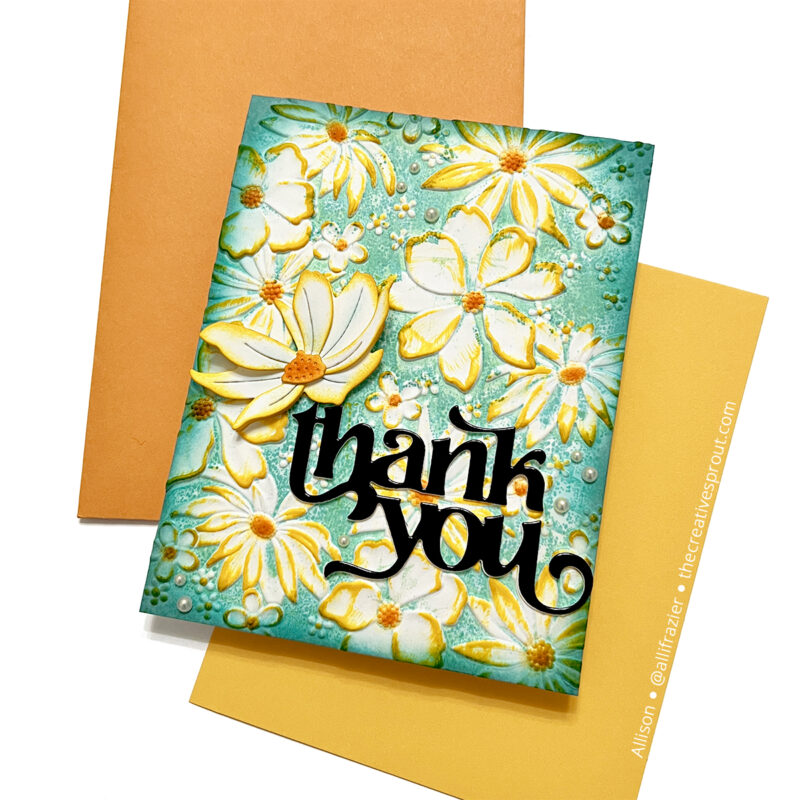
My card today features the new Blossom Bursts Embossing Folder and Fancy Thank You Die. If you saw my blog post from yesterday, I made another card with these two products, and it’s completely different! That’s what I love about embossing folders. There are so many different techniques to try, and of course, changing up your colors makes such a huge difference, as well.
For this card, I inked up my embossing folder with Waterfall ink from Pinkfresh Studio. There are two sides of the embossing folder. On one side, the flowers are raised. On the other side, the flowers are recessed. I call this the “flat” side because it’s where there is usually a bunch of flat area to swipe your ink pad across. I prefer felt pads for this technique because as you’re swiping across the folder. the firm felt pad won’t squish into the recessed areas where the flowers are. Of course, this technique is meant to look artsy – it’s never going to give perfect results. And I love it like that! I should mention that I used white heavy cardstock for this technique, and I spritzed a tiny bit of water on the panel before running it through the die cutting machine. This helps prevent cracks when you use 3D folders. I did one pass with that Waterfall ink, and then I swiped the “flat” side of the folder again with Mint ink. I didn’t ink this color up as heavy as I did with the Waterfall. Swiping the ink on the plastic folder will result in the ink “bubbling”, so that’s why the results aren’t perfectly smooth looking. I could have kept inking it up if I wanted it to look smoother, but again, I love the imperfect look. It’s easy to run through a second time (and 3rd and 4th and so on) because your embossed panel will pop right back into place in the embossing folder.
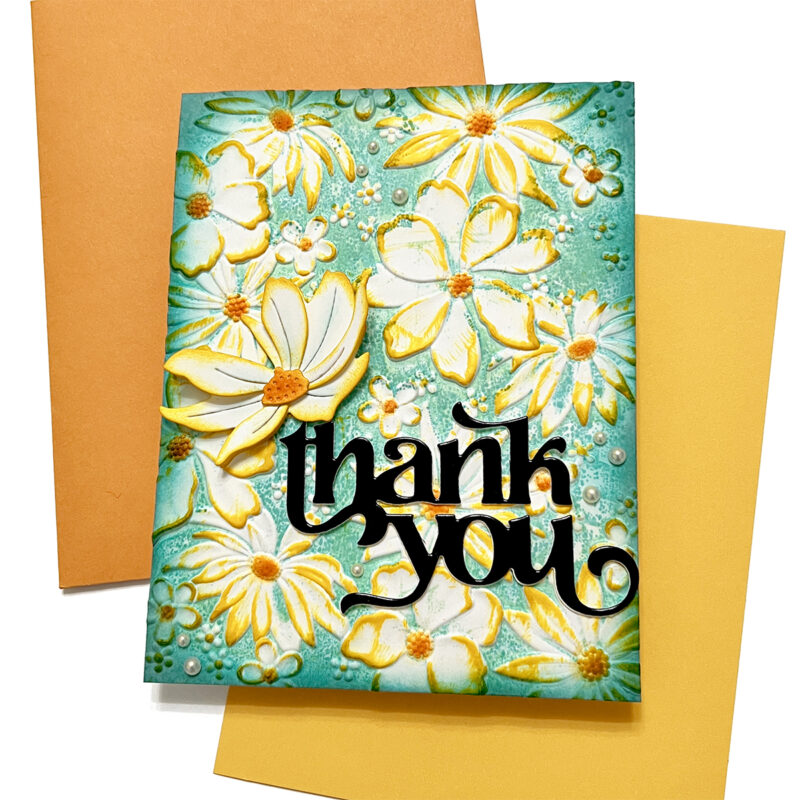
Once I was done with the turquoise background, I took my Gina K Designs Wild Dandelion ink pad and swiped it across the raised edges of the flowers. I just kept swiping it all over the entire panel. You’ll see that some areas are heavier than others. And that’s okay! I took a small detail brush and added some orange ink onto the centers of the flowers. To finish up the panel, I blended a darker color around the edges. I used Turquoise ink from Pinkfresh Studio for this part. It was a bit brighter and more vivid than I wanted, so I followed up with some Flannel ink (a warm gray) from Simon to tone it down. I think the results are beautiful!

For my sentiment, I used the new Fancy Thank You Die. I cut it from black glossy card stock because…don’t I always use black glossy card stock for my word dies?? I admit that it’s an obsession. I then remembered that I had a relatively new flower that kind of matched some of the flowers on this folder. I cut the Tattered Daisy Die from white card stock and inked up the edges with the same yellow ink that I used on the panel. I even swiped a little bit of that Waterfall ink down the middle of the petals, and then I colored the center orange. I think it looks so good popped up on the panel, and I think it adds such a great finishing touch. And speaking of finishing touches, I added a few white pearl embellishments around the panel.
Are you ready to hop along and see inspiration from all the other designers?
HOP ORDER:
I hope my card brings a smile to your face. Thank you so much for visiting my blog today. Be sure to hop along and leave some love for all of the talented designers sharing inspiration today. There will be another hop tomorrow with even more inspiration!
Wishing you all a crafty day,
Allison
SUPPLY LIST
Note: External links on my blog may contain affiliate links. This gives me the opportunity to earn a small commission when you click on the links and place an order. This comes at no additional cost to you. Thank you so much for your support! You can see more information on my Affiliate Disclosure page.
This card would brighten anyone’s day! Gorgeous!
WOW! Oooh how I love that beautiful Embossing Folder. Your cards are magnificent! They’re so fun and colorful and very HAPPY! Well done!
Ooh that is SO pretty! The citrus zing from the colour combo is delish. Love the way the colours look together. Just so delish xoxo
Well you knocked this folder outta the park! Well done !
Amazing! love the textures and the blend!
Beautiful, love the texture and colors.
Great card and inspiration!
I like how that one flower pops up from the card. 😊
Love your card!
Love your card – lots of color!
Allison, I think this is my favorite card so far of all that I’ve seen! I’m definitely going to have to get that Blossom Bursts embossing folder!! Thank you so much for sharing!
Fantastic inking on this embossing folder, Allison! I love how you added the die cut flower too!
Stunning card! The colors are amazing and the card just pops off of the page!
This card did indeed bring a smile to my face. Love the bright and cheery colors – perfect for summer!
Very different and pretty!
I saw Heidi showing this today and I was so impressed!
The embossing folder is so versital and looks phenomenal with so many techniques , can’t wait to play with it !
Love this new Blossoms folder. Love the colors you used.
Your flowers are amazing!
What a fantastic background and focal element for your card. I LOVE the way you used multiple colors to build up your beautiful background, then by adding the little flower die cut on top was perfect, It looked like it had been picked from the background. The black glossy Thank You was perfect & bold enough to stand out and be seen against your beautiful floral background.
I really like the color combo, it’s not one I frequently use – but will now!
LOVE this card! I’m a huge fan of the color combo. TFS 🙂
I think it’s safe to say that your card brought a smile to everyone’s face. What beautiful colors. It’s a grand card.
wow! the coloring is fabulous
Oooo the texture and colors are fabulous!
Beautiful 💜
So beautiful!!!!
Great thank you card. The embossed background looks amazing.
Stunning card. Love the colors you used
Love the way you used the embossing folder for this beautiful card! So pretty..
Dear Allison –
Wowza, this is a true STUNNER! Love it so much! I’m so glad I am a subscriber because I get to see your beautiful art all the time from your email contact.
Lori S in PA
Bold and beautiful! The colors are amazing and the black sentiment really pops. Amazing embossed background.
Awesome color combo and beautiful flowers! Love the dimension and pretty sentiment too!
I love the bold colors with the black sentiment. I always admire it and need to do it more.
I loooove this color 😍 combination it’s so cheerful 😊
I would love to receive this card, it would brighten any ones day. Love this
Super Cute cards. Thanks for sharing.
OOOOOOH, I love how you colored the edges of the flowers. It makes them extra pretty and interesting.
Very creative layout and beautiful colors!
This is stunning!
Wow! This card is stunning- love the color combination! The texture is amazing!
Love your cards! Beautiful color choices! Great job!
Wow, this is so cute!
What a fun, summery card!
Wow! What a bright, happy card!!
Your card DID bring a smile to my face ! I love your color choices and techniques! Thank you for sharing your talent and inspiration!
Your card is so beautiful. I was on the fence about this embossing folder until I saw your card. Thanks for sharing
Love what you did with the Blossom Bursts embossing folder! Adding that extra daisy really adds to it! And the color you achieved on the background is fantastic!
Cheerful card.
Love the color combo you used!
So beautiful, love this!
This card will make anyone happy, stunning 😍.
This card will make anyone happy, stunning card 😍.
I really love your bright sunshiney card! Your color combination is just perfection!
I love this bold card!
Absolutely Fabulous card!!
Beautiful card
So beautiful!! I love the colours you used!
Love the gorgeous background
Amazing card! Love the pretty color combo and that embossing folder technique!
Gorgeous card with fabulous colors! A true celebration of summer!
Lovely card! It goes well with your blog name, too!
Very interesting look
So pretty! What an interesting and incredible technique. Wonderful results. I like the colors.
Gorgeous card-I love the inks you added as you embossed the card–I like to do this technique too, it’s easy but has an awesome effect! Thanks for the inspiration!
I love your use of the tattered flower die with the materials of the new release. It helps me to see the possibilities of intergrating my products. Your card is lovely.
Gorgeous! Love the blossom burst.
So pretty! I like that you used the glossy black for the sentement.
What a beautiful card! Great folder and choice of colors!
This is a gorgeous card! Can’t wait to try it!