Hello, friends! For all of you who celebrate Christmas, I hope you had a wonderful, peaceful holiday. For those who celebrate Chanukah, or for those who celebrate both, like my family, I wish you love and joy this Festival of Lights. Yes, I like to spell it “Chanukah,” although I know that people are more used to seeing “Hanukkah”. They are both correct! As for this holiday season, I don’t think it’s any secret that I have not been making as many cards lately. But things are picking back up, especially as we head into the new year! Every year, I like to make a new Hanukkah card design that is based upon a product that is typically meant for Christmas. This year, I chose a wintery die to create my “duo” of cards.
NOTE: all supplies are linked in the thumbnails at the end of this blog post.
I just recently replenished a lot of my embellishments from Pretty Pink Posh, including my favorite 4mm sequins in all the colors. I also couldn’t resist buying more of their shaker beads in various color palettes. While I was at it, I bought their new Snowflake Shaker Dies, as well as the Winter Hat Shaker Dies. I used some new-to-me Doodlebug Design paper to coordinate with the fun shaker beads. The main pack of paper that I played with is called “Snow Much Fun,” which of course is perfectly named for my cards today!
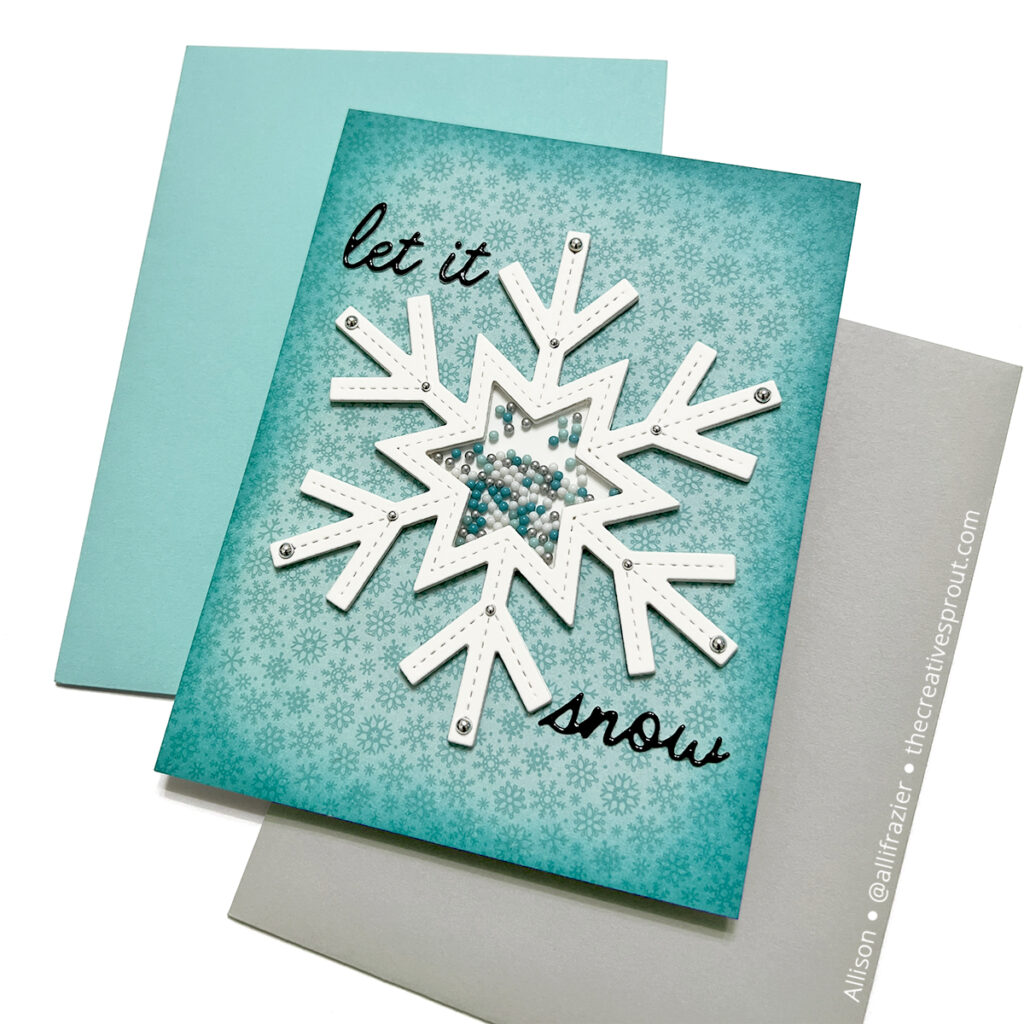
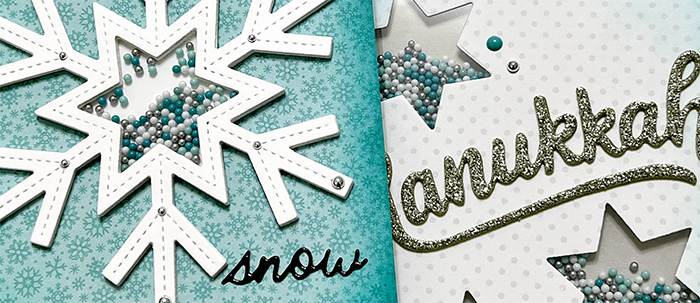
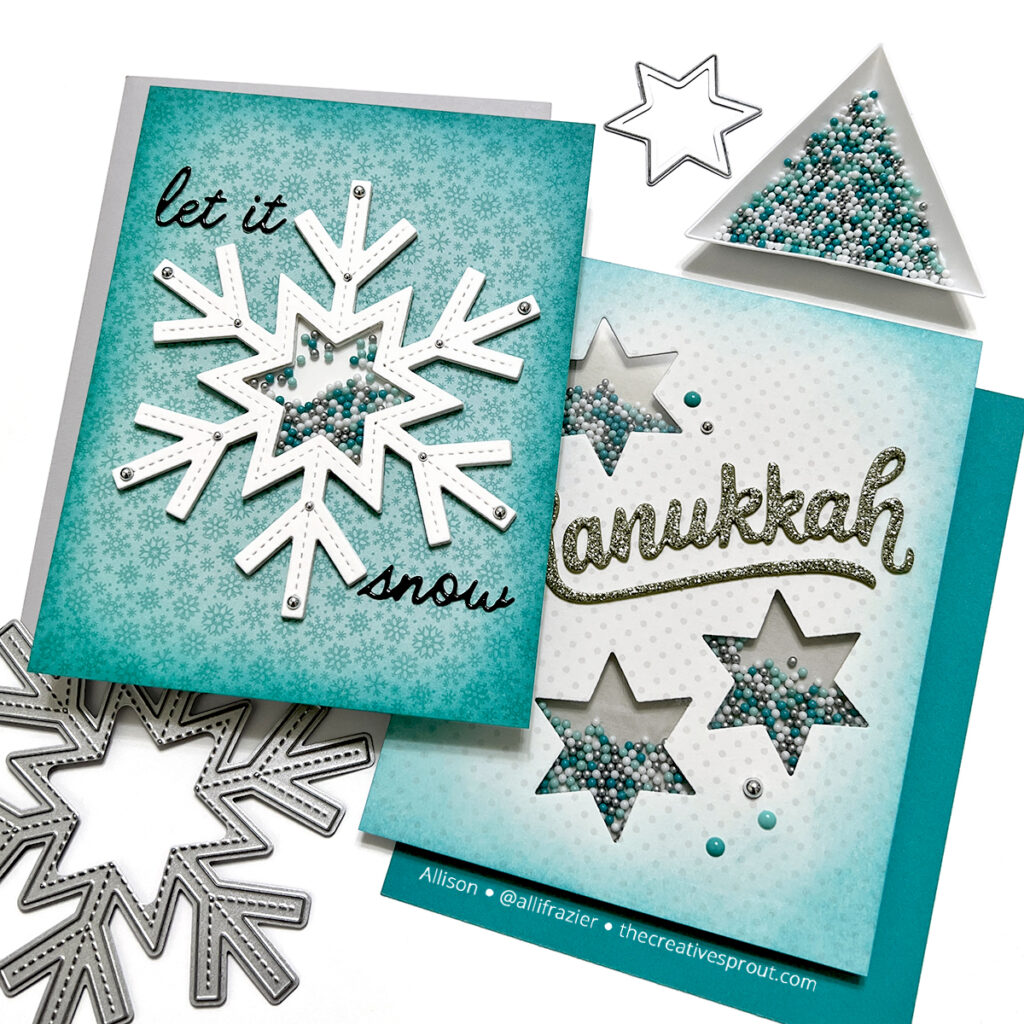
When I first saw this Snowflake Shaker Die and the star that creates the opening for the shaker area, I knew it was perfect to make my “duo” since this star is shaped like the Star of David. But first, I made the “intended” snowflake shaker card! I chose some snowflake paper from the Snow Much Fun paper pad and inked up the edges with turquoise ink in order to create a glow in the center. I then cut the snowflake 5 times from heavy white card stock. I taped the interior star with the snowflake so that it would create a consistent opening on all 5 snowflakes. I glued 4 of the snowflakes together. I then cut another partial snowflake without the star so that it would cut a solid area in the middle. I trimmed this down and glued it to the back of the stack of snowflakes. I added my “Snow Days” shaker beads into the resulting well, and then I added a piece of acetate on top. I had trimmed the acetate down and adhered it with Scor-tape. Another layer of Scor-tape on top allowed me to add the 5th snowflake on top, and voila! I glued the dimensional shaker to my card panel and then added some silver pearls on top. The sentiments, which I cut out of black glossy card stock, come from the Handwritten Holiday Sentiments from Spellbinders and Simon Hurley. I love how this turned out!
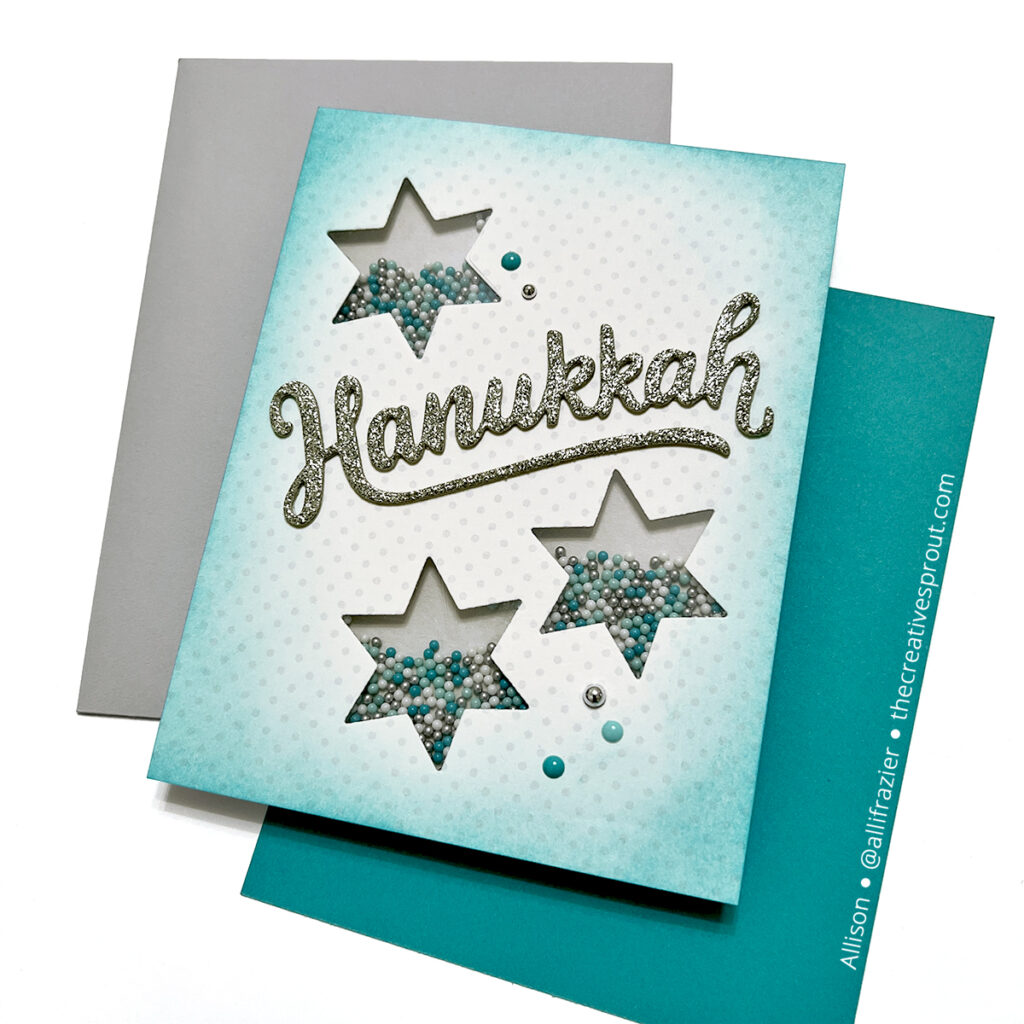
Now let’s move on to the Chanukah card. I started with another panel of paper from Doodlebug Design. This paper comes from the “Hometown USA Petite Prints” 12×12 pack. I again inked up the edges with turquoise ink. I then took the star die from the Snowflake Shaker Die set and cut three openings. On the back side of this panel, I added foam strips around each star so that I could fill each star separately with the shaker beads. I then filled the rest of the panel with foam tape and added a gray card base on top of the foam to enclose the shaker. Confession – I added the card base upside down, as I had originally intended the two stars to be at the top. I can’t tell you how many times I add my card panels upside down to card bases LOL! Instead of trying to “fix” it, I just went with it, and now the two stars are at the bottom. The Hanukkah sentiment comes from one of my favorite Hanukkah dies from Kat Scrappiness. This set also comes with the word “happy” along with a shadow die. I cut the Hanukkah out of silver glitter card stock. I added a few silver pearls and turquoise enamel dots, and we’re done! I love it!
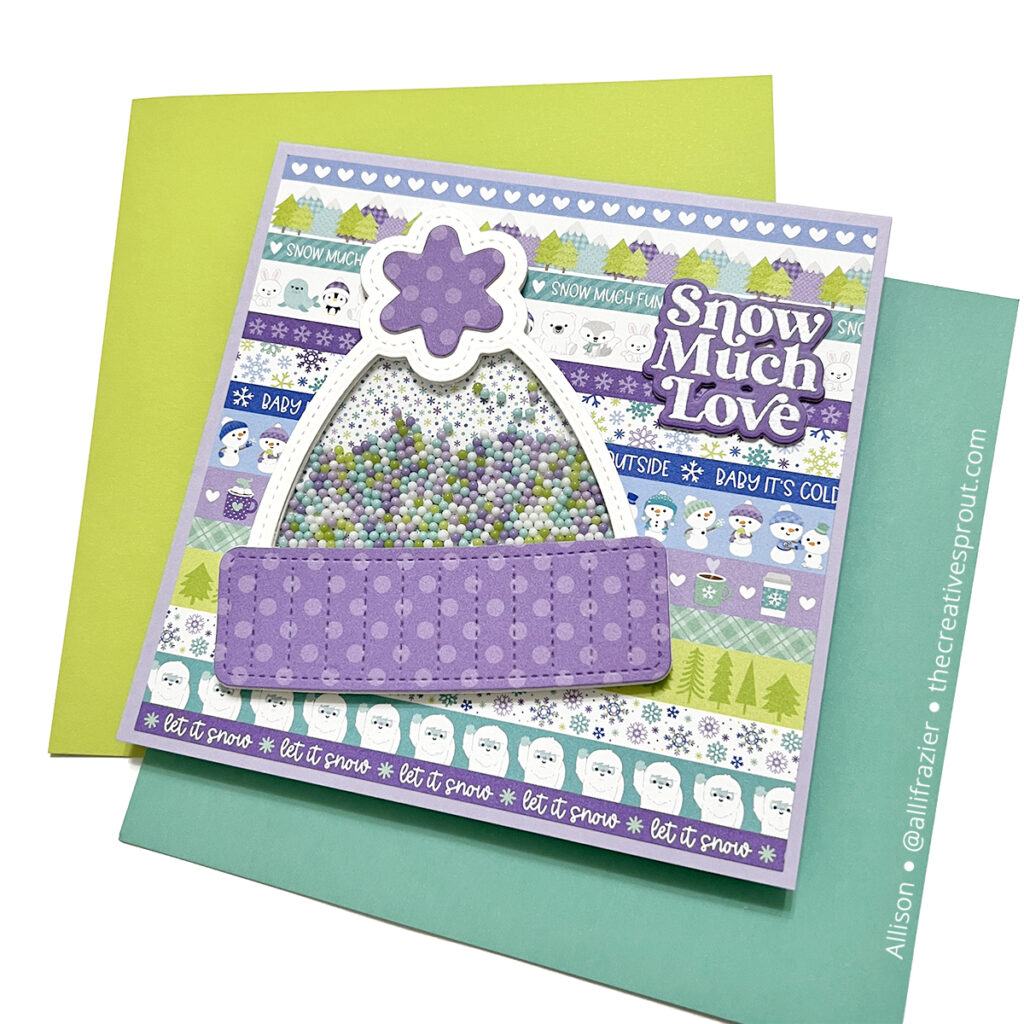
We aren’t done yet because remember I have that adorable Winter Hat Shaker Die, as well! One of the shaker bead packs that I purchased is called “Pastel Party,” and the beads are a perfect match to the Snow Much Fun paper pack from Doodlebug. I chose a paper from that pack for my background that I wouldn’t normally choose, but how cute is it? There are usually papers like this in every Doodlebug pack, and I honestly never know how to use them. I cut this paper down to 5×5 and added it to a slightly larger lavender card base. I created the shaker in a similar way to the snowflake shaker above, building it up with five layers of white card stock. I picked a different paper (the tiny snowflake pattern) from the pack for the background of my hat. The purple polka-dot paper also comes from the pack. Like I said, the colors couldn’t have tied in better with these shaker beads! The “Snow Much Love” sentiment comes from the Snow Cheer Sentiments from Waffle Flower. I love how I can send this to someone during the winter, especially since I admittedly did not get all my Christmas cards out in time!
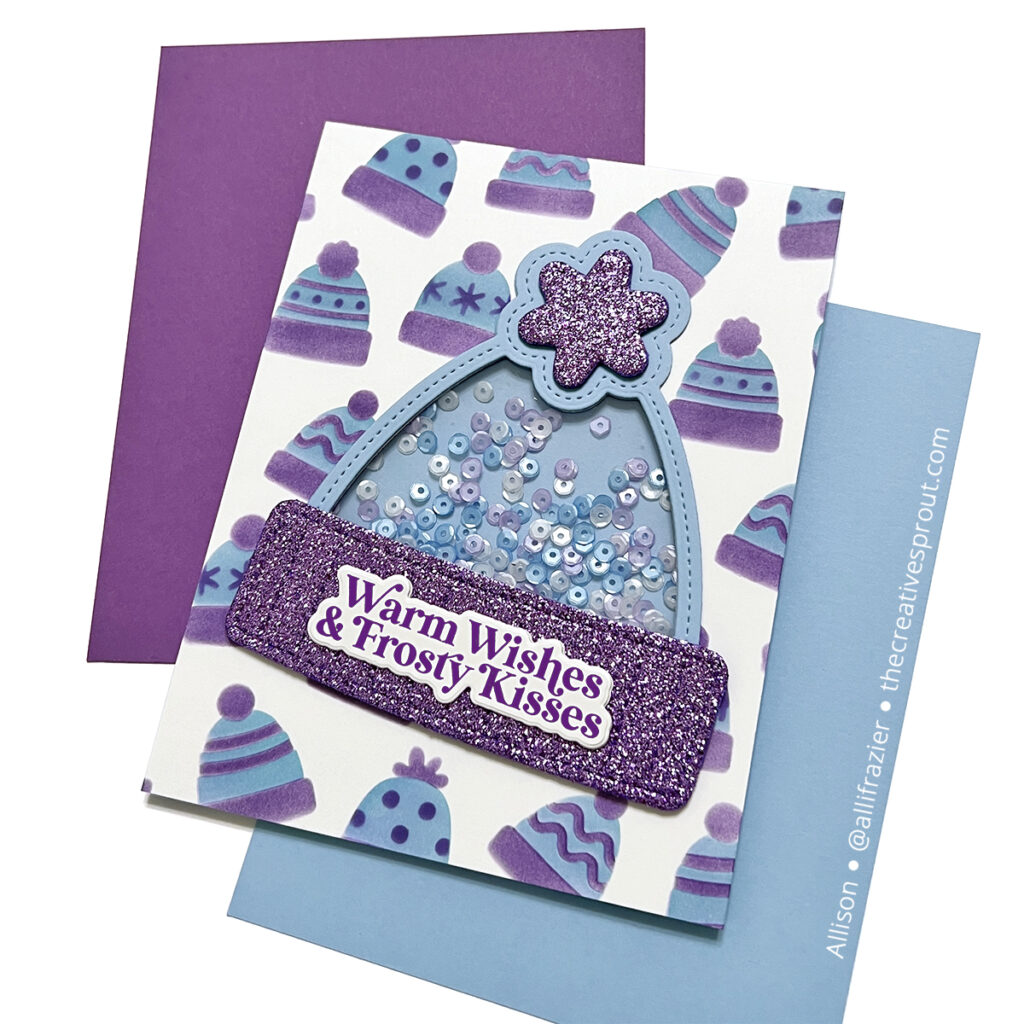
One last shaker card! Did I mention that I also bought the Layered Winter Hats Stencils from Pretty Pink Posh? I used some purple and blue ink to create the hats. This stencil set has two stencils, although I played around a bit with the inks until I was happy-ish with the resulting colors. I used Distress Oxides for my blending – Villainous Potion and Broken China. I think I started with Shaded Lilac before I decided to go with the Broken China. I struggle with purples! How about you? What color do you find challenging?
I created this shaker similar to the Hanukkah card, in that I cut a hole in my stenciled panel using the interior portion of the hat that creates that shaker area. I added acetate to the back of the panel, using Scor-tape, and then I added the foam tape to enclose that shaker area. This time, I used 4mm sequins for the shaker bits. After filling in the rest of the panel with foam tape, I added a blue card base on top to enclose it all up. And, I didn’t add it upside down this time! Yay me! I glued my blue shaker outline hat on top of the panel, and then I added the rim and “ball” of the hat using a purple pop-up glitter sheet from Spellbinders. By the way, to create that “rim”, you do need to fussy cut the top, since there is only one die that creates the hat. The sentiment comes from the same Snow Cheer Sentiments set from Waffle Flower that I used on the other shaker hat card above.
I hope these cards bring a smile to your face today. As always, I appreciate you visiting my blog today.
Wishing you all a crafty day,
Allison
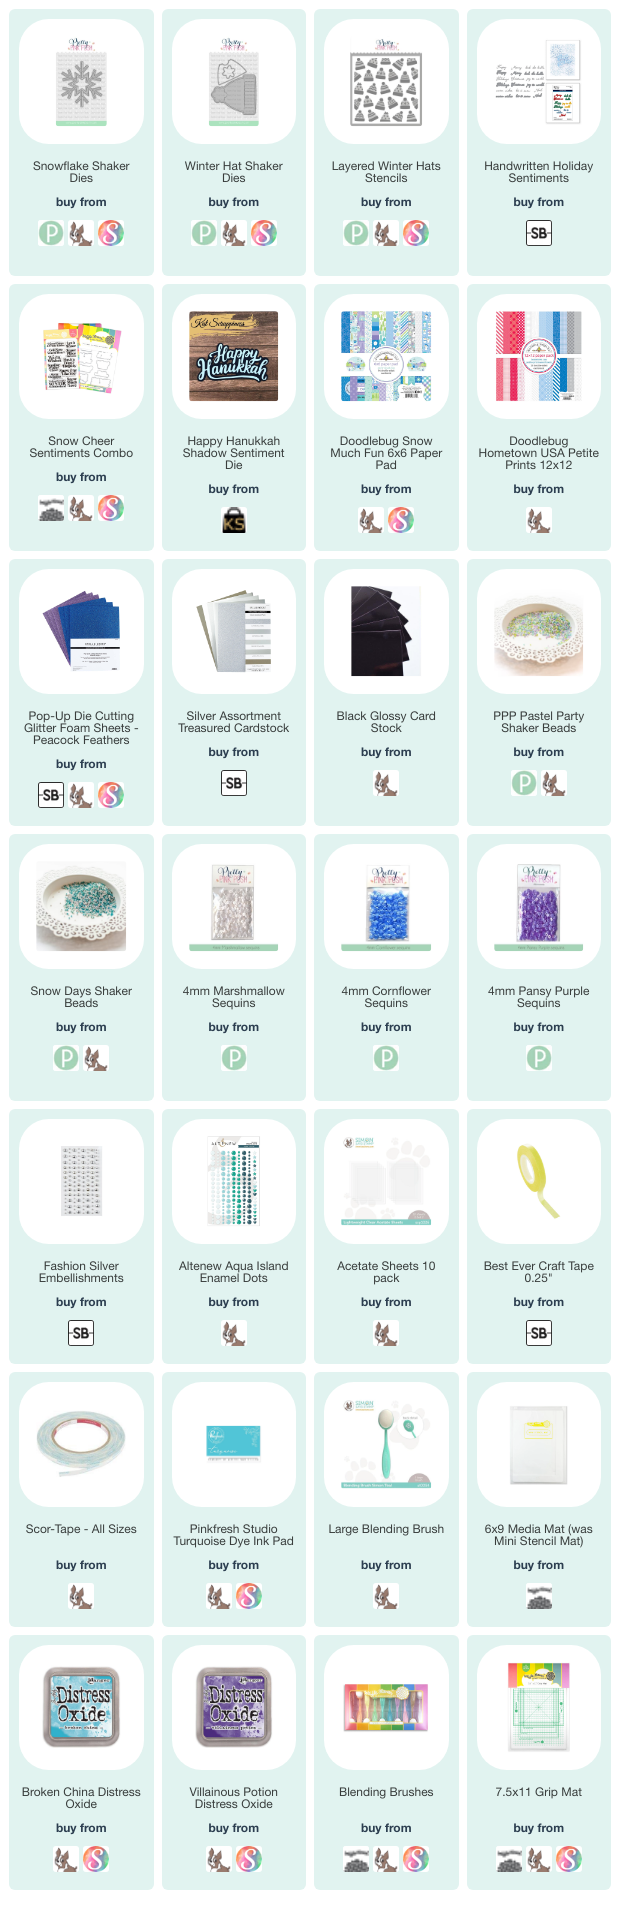
SUPPLY LIST
Note: External links on my blog may contain affiliate links. This gives me the opportunity to earn a small commission when you click on the links and place an order. This comes at no additional cost to you. Thank you so much for your support! You can see more information on my Affiliate Disclosure page.
Pretty, adorable and creative cards. Thank you for the inspiration.