Hello, friends. I’m really excited to share some new collections that were just released by Spellbinders. If you like realistic looking florals, you will love the new collection “The Painter’s Garden” by Susan Tierney-Cockburn. If you love elegant designs and hot foiling, Yana Smakula has a new collection called “Anemone Blooms.” And finally, if you love a bit of whimsy, Vicky Papaioannou has a new collection called “Showered With Love.”
Card 1 Supplies
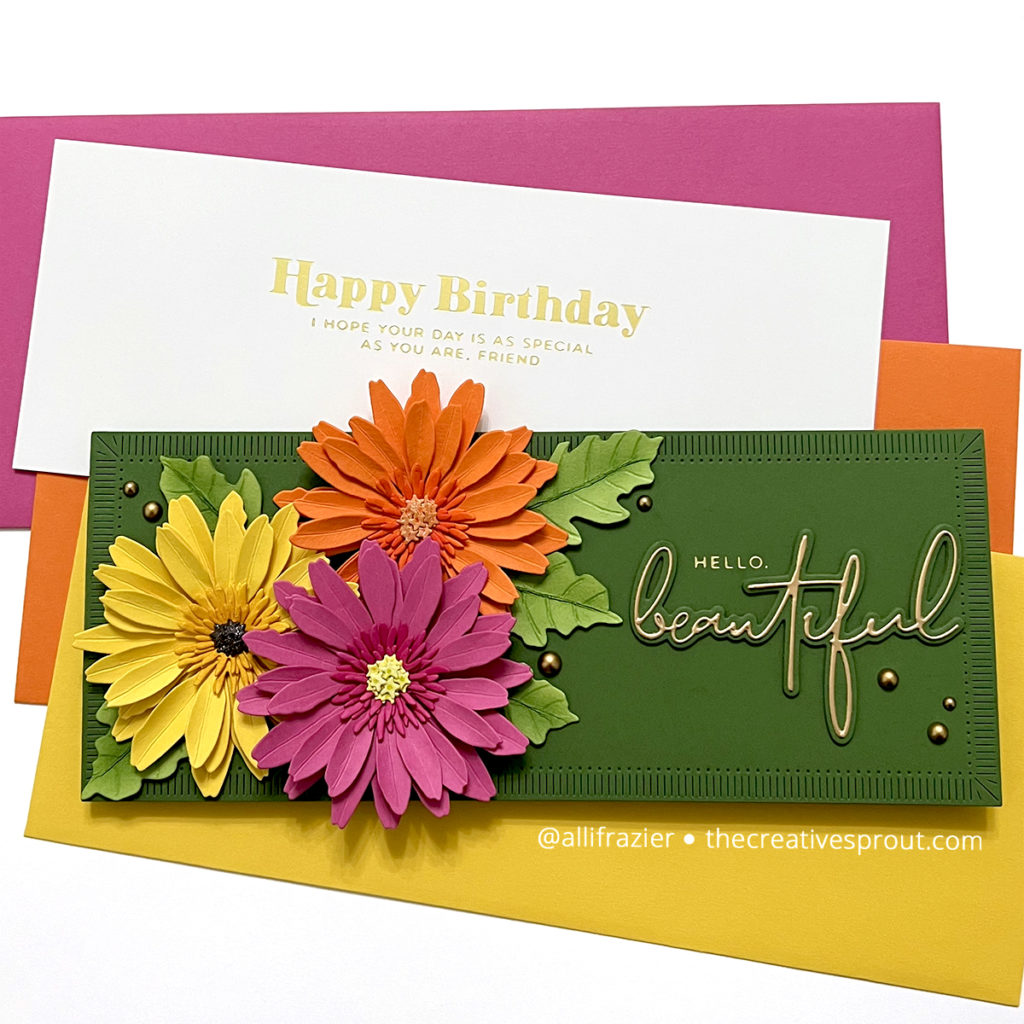
Spellbinders – Gerber Daisy and Ladybugs Die Set
Spellbinders – Fluted Classics Slimline Die Set
Spellbinders – Wonderful Script Sentiments Die Set
Spellbinders – Hello, Friend Sentiments Glimmer Hot Plates
Spellbinders – Matte Gold Hot Foil
Spellbinders – Glimmer Hot Foil System
Spellbinders – Platinum 6
Bearly Art Glue
Making the First Card
I’m starting with this card first because Gerber daisies are one of my favorite flowers. They also remind me of my sister, who loved these, too. This Gerber Daisy die set may look simple, but it packs a punch, especially when you take a few extra steps to make the flowers look more realistic. Susan, who designed this collection, also has a tool kit with everything needed to add those realistic touches. I don’t have the tool kit, but it’s pretty cool, especially if you don’t already have these tools. I happen to have an old set of stylus tools in my stash, and that’s what I used.
For each daisy, there are two sizes of the main flower die. I cut each of these sizes twice, for a total of four flower pieces per color flower. I also cut two each of the two inside pieces. I took a thin stylus and ran a line down the middle of each petal. I then lightly misted water onto the petals so that I could gently roll them around the barrel of my smallest stylus. This is what gave each petal dimension. I then rolled a large stylus ball in the center of each flower to get all the petals to curl up towards the center. I glued the centers of all four flowers together, making sure to offset the petals. I did this for each of my three daisies. For the inside pieces, I inked each piece with a slightly darker color of ink than the card stock so that they would stand out from the main flower. I also used a stylus to get the centers to curl up. For the very center detail of the flowers, I used the die from the set that creates these little star-like shapes. I glued them all into the center, used a color pencil to give some highlights, and then added some shine with a shimmer pen. You can also use gems or something else to create that center detail.
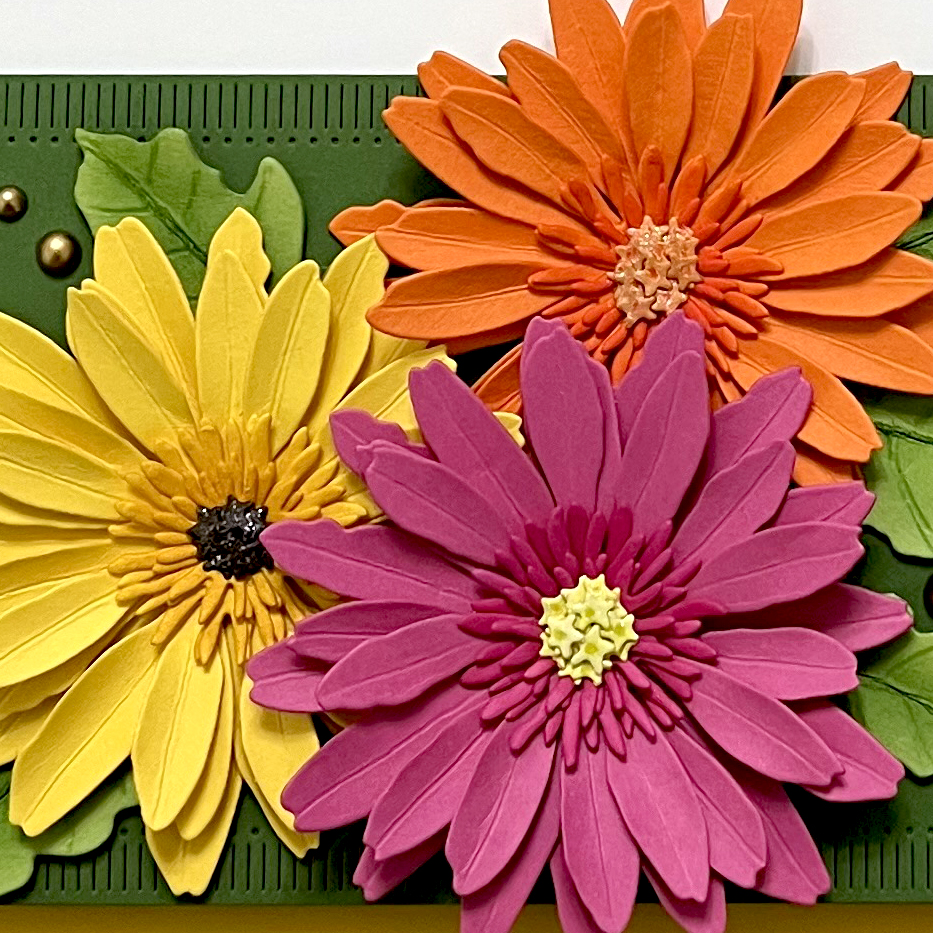
For the leaves, I cut them from green card stock, scored them down the middle and gently folded them so that I could brush a little bit of darker ink along that line. I took a very thin stylus and created veins, and then I ran a darker green colored pencil along those vein lines. I used a darker green card stock to create a slimline card base. I cut the main panel using the Fluted Classics Slimline Die Set. I used the same green card stock to cut the shadow for the “beautiful” sentiment, for which I cut the detail die out of gold card stock. I love how the shadow dies from this set can be used to cut out the hot foiled sentiments from the Hello, Friend Sentiments Glimmer Hot Plate set. Before glueing everything to the panel, I figured out where I was placing the sentiment so that I could position and hot foil the “Hello” with matte gold foil. To finish the card, I scattered some matte gold embellishments from my stash.
Card 2 Supplies
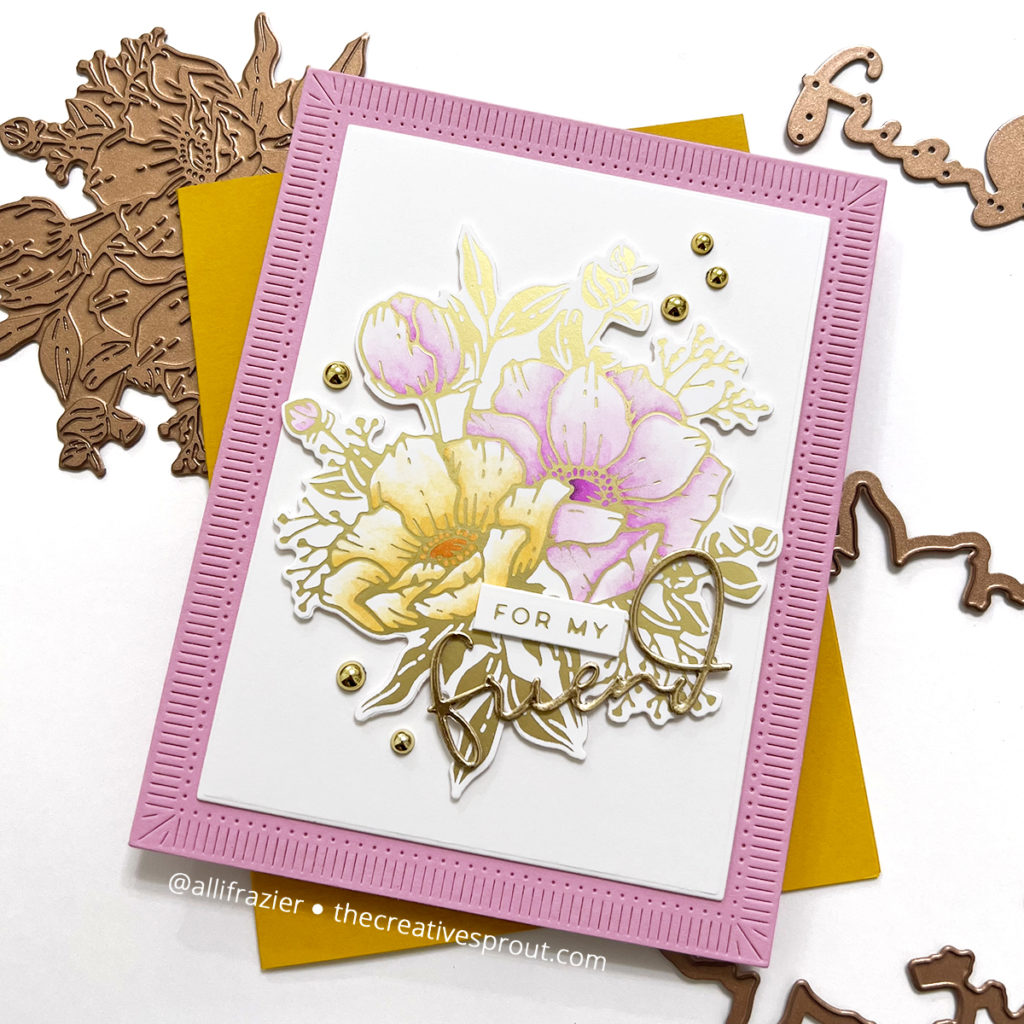
Spellbinders – Anemone Glimmer Blooms Hot Plates & Die Set
Spellbinders – Hello, Friend Sentiments Glimmer Hot Plates
Spellbinders – Fluted Classics Rectangle Die Set
Spellbinders – Fashion Gold Embellishments
Spellbinders – Matte Gold Hot Foil
OLO Markers
Spellbinders – Glimmer Hot Foil System
Spellbinders – Platinum 6
Making the Second Card
For my second card, I used products from Yana’s gorgeous new collection. I hot foiled the Anemone Blooms with matte gold foil. I colored them with my OLO markers, which are now sold on the Spellbinders site. l do have Copic markers, but I am really becoming an OLO convert. I can’t tell you how many times I pick up a Copic marker only to find that it has dried out. If you haven’t tried coloring an image that you have hot foiled, you should definitely try it. I do not proclaim to be an expert colorist, especially when it comes to florals, but I’m happy with how this came out! I cut the blooms out with the matching die that comes in the set. I also cut the “friend” die from the same set out of gold card stock, stacked it three layers high and set it aside. This is a very delicate die, and it does come with a matching shadow die, although I did not use that today.
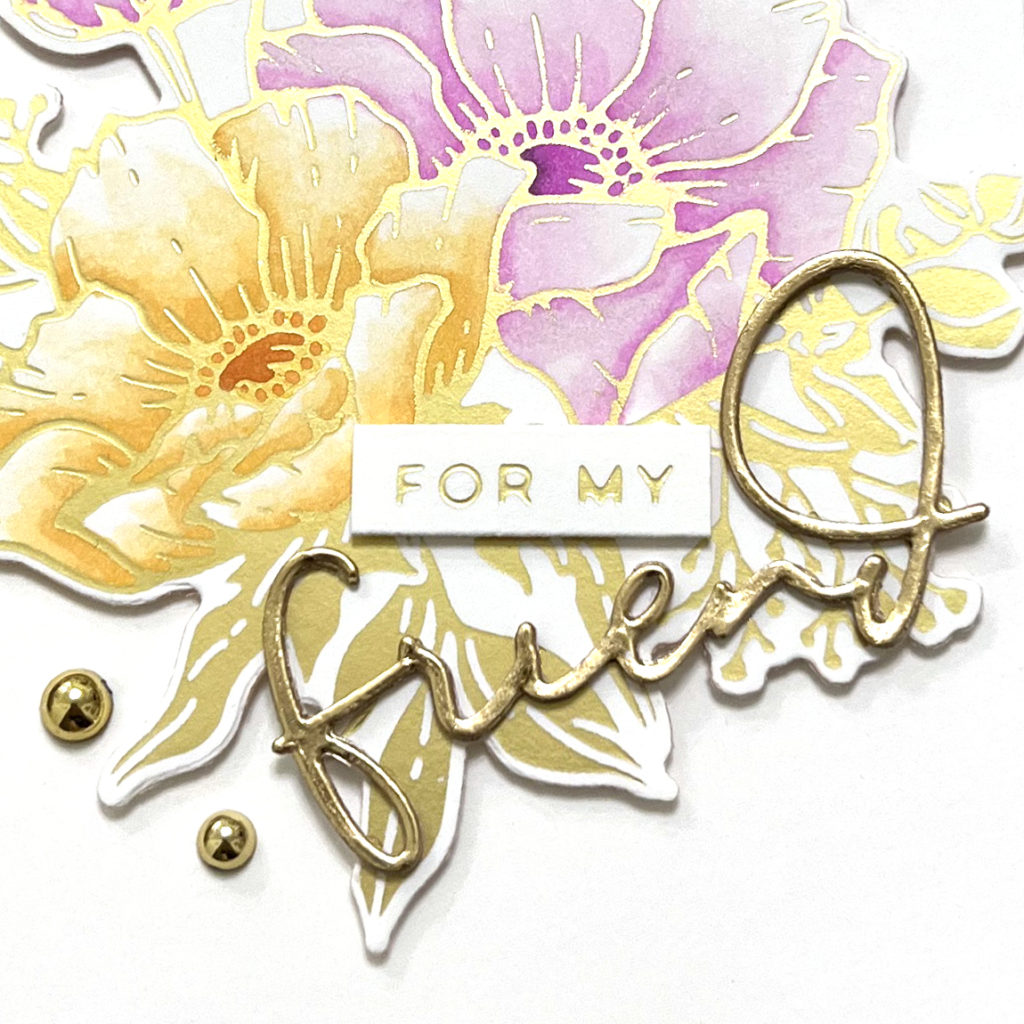
For my card base, I used a pink A2 card base and cut a front panel for it using the Fluted Classics Rectangle Die Set. I cut the white middle panel using a die from the same Fluted Rectangle set. I popped the Anemone blooms up on foam tape in the middle of the panel and then glued the “friend” die towards the bottom. I hot foiled the “for my” sentiment with matte gold foil and then trimmed that down. I finished the card with some gold embellishments.
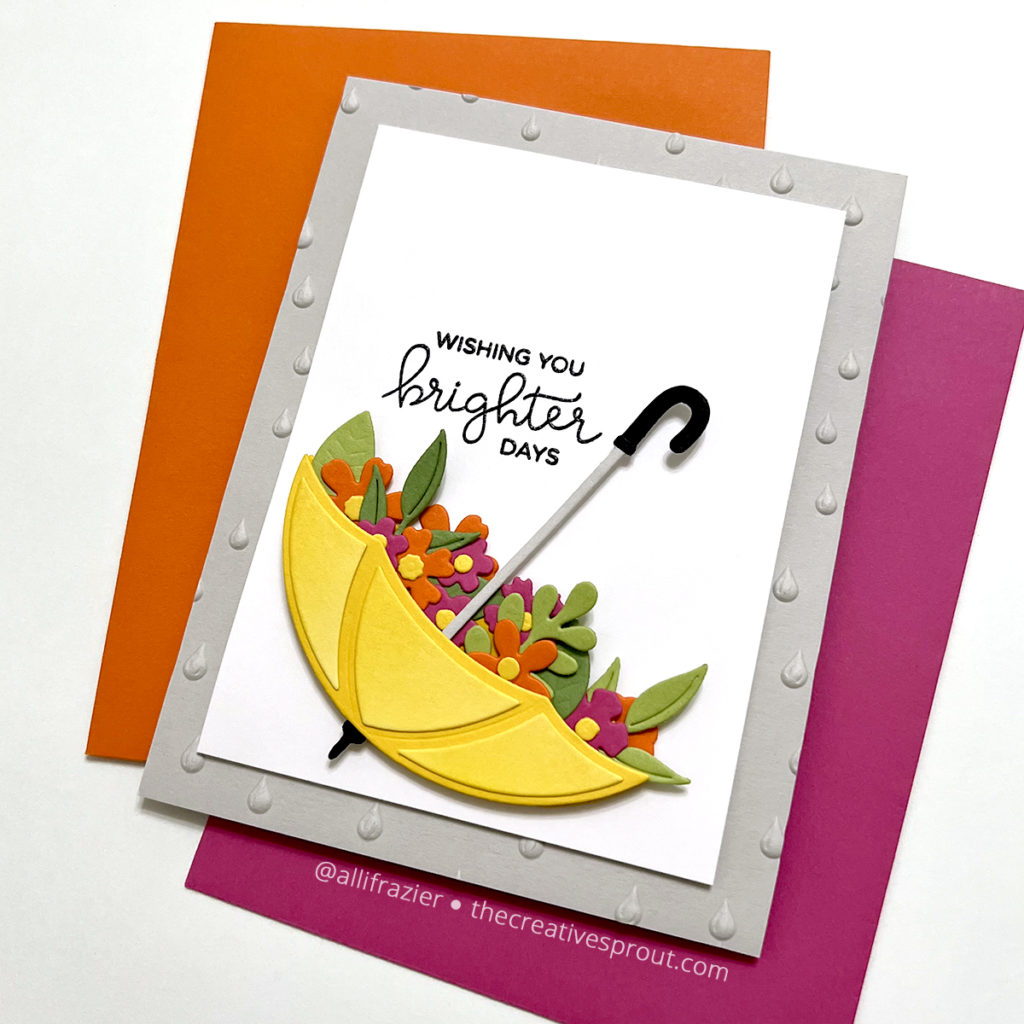
Card 3 Supplies
Spellbinders – Umbrella Bloom Die Set
Spellbinders – Raindrops 3D Embossing Folder
Spellbinders – Universal Plate System
Spellbinders – Platinum 6
Bearly Art Glue
Making the Third Card
Vicky Papaioannou has designed another amazing collection, and this card features two of the new products. I first embossed a panel of light gray card stock using the new Raindrops 3D embossing folder. Then I moved on to making my umbrella. This die set has 27 dies! There are several different ways to design the main umbrella, and then there are tons of floral elements. It really is so fun! I kept mine pretty simple today, although simple is not a good word for something so colorful and fun!
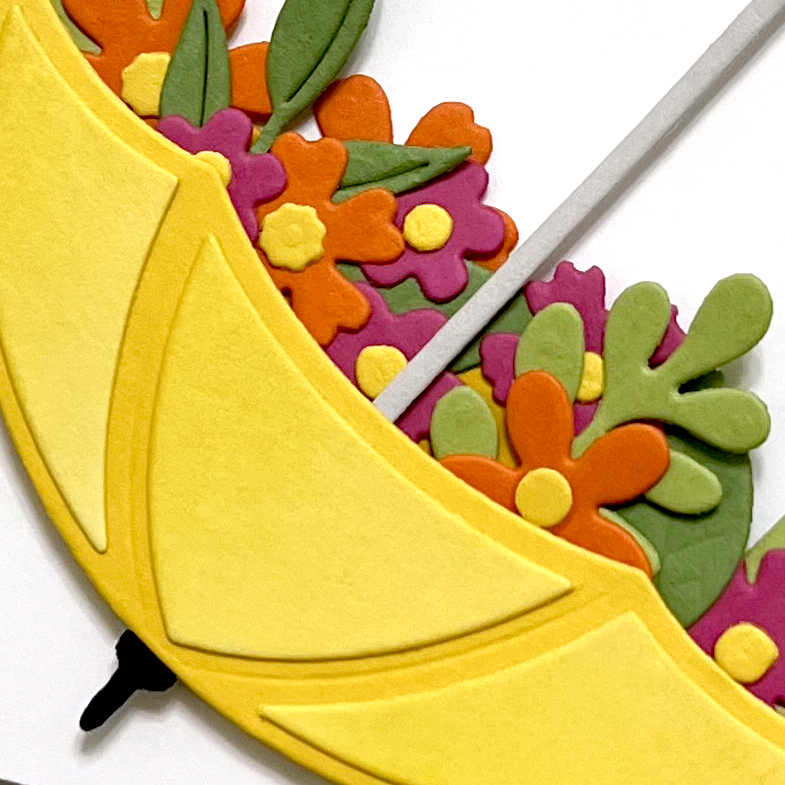
I popped my umbrella up on foam tape onto a white panel of card stock that I had already adhered to my card base. When I’m adhering a flat panel to a base that has been 3D embossed, I often find that using foam tape is easier. I have some thin foam tape in my stash that I like to use. And I almost forgot – the sentiment on the card comes from the Rainbow Script set from Hello Bluebird. There is a fun set of sentiments that Vicky designed for the collection, but I don’t have it – YET!
Inside Sentiments
There are many new glimmer plate sets that are part of the Anemone Blooms Collection, including the Inside Card Glimmer Sentiments Hot Plates. I love this addition to Spellbinders’ growing hot foil plate collection because I always struggle with what to put on the inside of my cards. Plus, now I can have the inside look as polished and elegant as the outside.
I really had fun making these cards. Each one is so different and required different techniques, which I love. I hope they put a smile on your face. Be sure to check out all of the new goodies on the Spellbinders website – there are SO MANY! Thank you so much for stopping by today. Leave a comment and let me know what your favorite new collection is.
Wishing you all a crafty day,
Allison
Note: External links on my blog may contain affiliate links. This gives me the opportunity to earn a small commission when you click on the links and place an order. This comes at no additional cost to you. Thank you so much for your support, as this helps me bring you more content.