Hello, crafty friends! I am so excited to be participating in the STAMPtember® 2022 Blog Party for Simon Says Stamp!
If you’re not familiar with what STAMPtember® is, it is a month long celebration of stamping and creating. Simon Says Stamp kicks off the celebrations each year by releasing their collection of goodies on September 1st. Throughout the month, they also release exclusive products that are made in collaboration with other companies. These are always hot commodities, and once they’re gone, they’re gone! The Simon-branded products that are released at the beginning of STAMPtember® do not go away, although they may briefly go out of stock at the beginning of the celebration. You can see all of Simon’s new releases here. Simon is also offering several exclusive promotions. See the graphic and promo code below – 5RQ8RQ3G – for a pair of Detail Blending Brushes FREE with any purchase!* There are other promotions, and you can only use one per order, so figure out which one you want to use by visiting all the designers’ blogs! For a list of all the designers, head over to the Simon Says Stamp blog.

I was given the Sassy Thankful stamp set from CZ Design to play with. How did they know that I love sass? This set is such a fun departure from the typical Thanksgiving sentiments. And while there is a lot of sass, there are also a couple large sentiments that can be used on traditional (non-sassy) cards.
Card 1 Supplies
Simon Says Stamp / CZ Design – Sassy Thankful Stamp Set
Simon Says Stamp – Repeating Circles Die
Simon Says Stamp – Intense Black Ink
Neenah 110 lb White Card Stock
Making the First Card
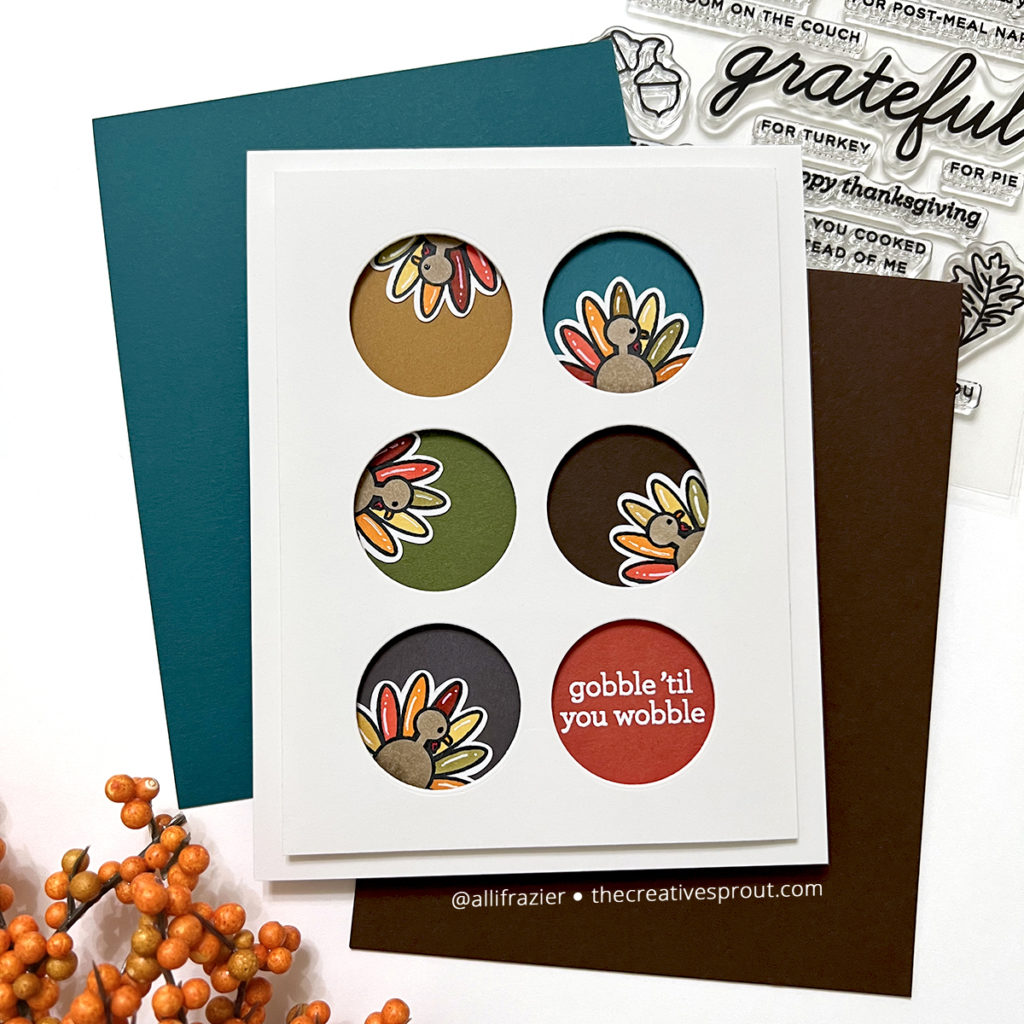
The turkey image in this stamp set is just so cute! I knew I wanted to use the “gobble ’til you wobble” sentiment, so this was the first card I made. I stamped the turkey multiple times with Copic-friendly ink and then I colored them with my Copic markers. I used the same autumn-inspired colors on all of my turkeys. There is a matching die set that includes a die to cut out the turkey, but I don’t have it, so I fussy cut my turkeys. I added some white gel pen highlights to the turkey feathers and a dot of black glaze pen to the eyes.
Next, I used the Repeating Circles Die to cut a panel of heavy weight white card stock. I used another piece of white card stock to adhere some pieces of autumn colored card stock that would peek through the circles that I had just created. For the red piece in the lower right corner, I first heat embossed the sentiment with white embossing powder. I used my Repeating Circles panel to make sure that the colored card stock was lined up appropriately. Once I finished that, I then played around with the orientation of each turkey until I was ready to adhere them down with glue. I put some foam tape on the back of my top panel and then adhered that to my back panel before adhering the whole thing to a white A2 card base.
Card 2 Supplies
Simon Says Stamp / CZ Design – Sassy Thankful Stamp Set
Simon Says Stamp – Postage Stamp Edge Frames Die Set
Tim Holtz – Vintage Photo Distress Oxide Ink Pad
Tim Holtz – Fossilized Amber Distress Oxide Ink Pad
Simon Says Stamp – Intense Black Ink
Neenah 110 lb White Card Stock
Making the Second Card
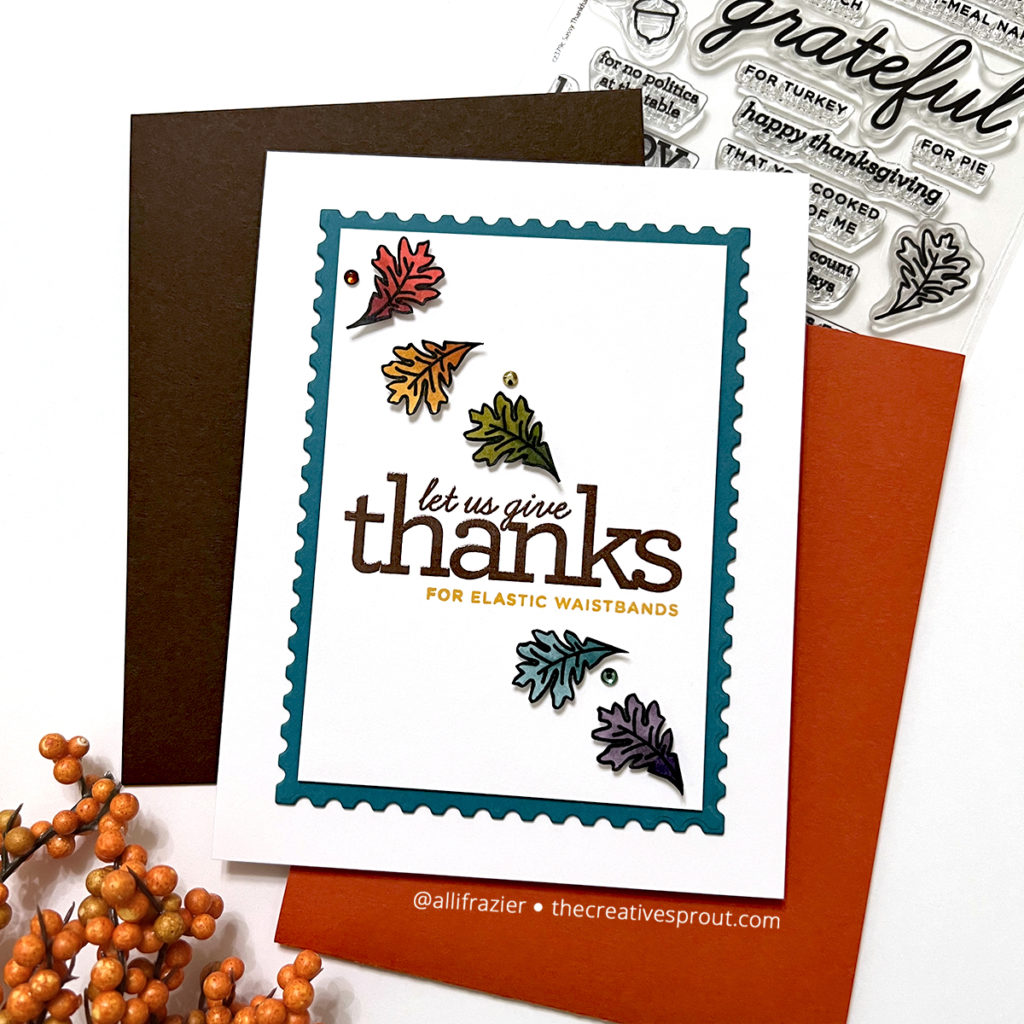
For my second card, I wanted to use the leaf image and play with similar colors that I had used for the first card. I again stamped my image multiple times with Copic-friendly ink and colored them with my Copic markers. This time, I fussy cut the images right up to the outline.
I cut a piece of teal card stock with one of the postage stamp dies, which helped determine the size of my top white panel. I stamped my sentiments with Distress Oxide Inks. I like using Distress Oxides when I want to have a colored heat embossed sentiment. You just stamp with the Oxide and heat emboss with clear embossing powder. The main sentiment is Vintage Photo and the secondary sentiment is Fossilized Amber (I did not heat emboss that one). I just LOVE this sentiment about elastic waistbands. And sadly, I can relate!!
To finish the card, I popped each of the leaves up on a foam square and added a few small jewels in complementary colors. I don’t usually do such clean and simple designs, but when you get a Cathy Zielske stamp set to play with, the clean and simple mindset takes over!
Card 3 Supplies
Simon Says Stamp / CZ Design – Sassy Thankful Stamp Set
Simon Says Stamp – Postage Stamp Edge Frames Die Set
Simon Says Stamp – Joyful Frame Die
Neenah 110 lb White Card Stock
Tim Holtz – Guillotine Paper Trimmer
Making the Third Card
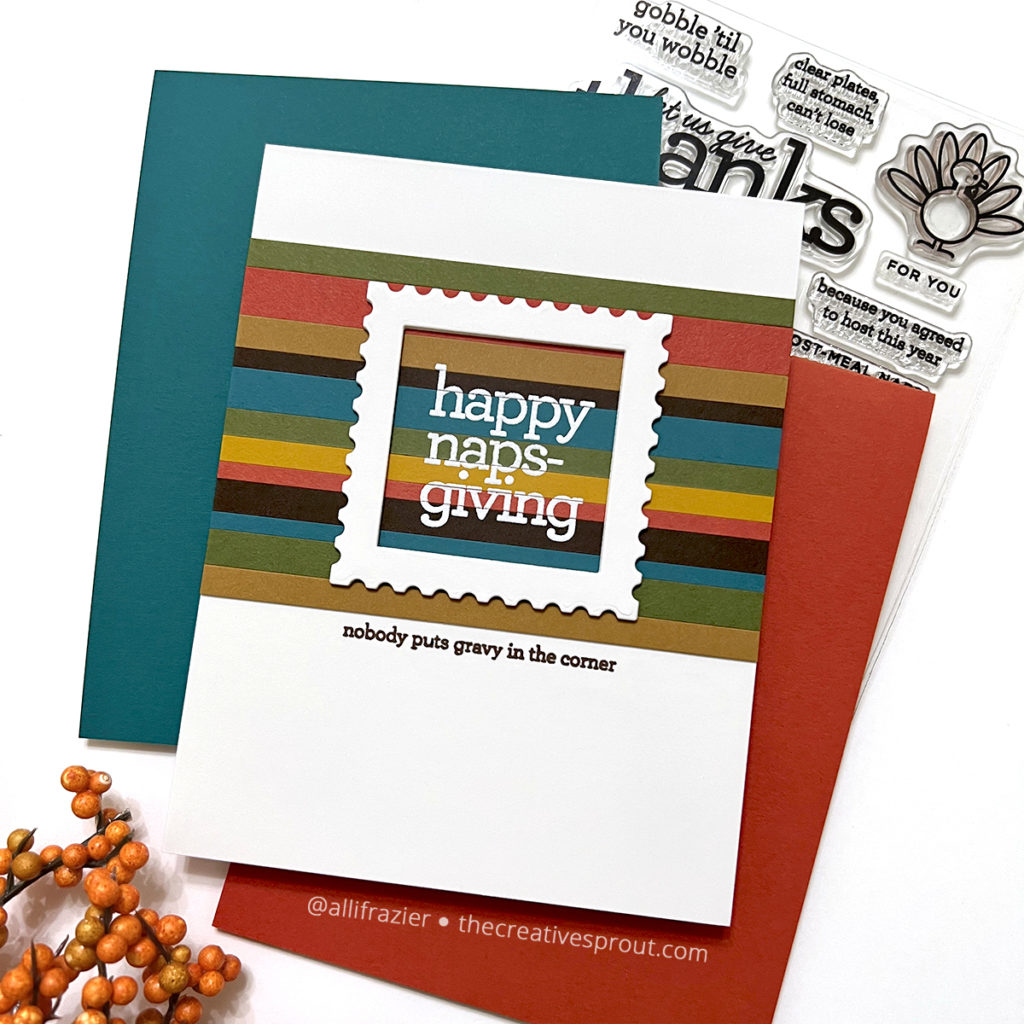
There are too many funny sentiments in this stamp set, and I just had to use the “nobody puts gravy in the corner” one. I first die cut a white piece of card stock using the square postage stamp die. To make it into a frame, I used the square die from the Joyful Frame set. It is the perfect size to cut the center out of the postage stamp piece and leave a decent sized frame. I did this three times so that I could stack the frames for dimension. I then cut a bunch of paper strips with my paper trimmer and adhered them to a white A2 card base. I positioned my card base in my MISTI and then positioned my frame where I wanted my main sentiment to be. I then placed the stamp in position and stamped it with embossing ink several times. I then heat embossed it with white embossing powder. I repeated this a couple times to try to make the image more solid. TIP – if you are going to stamp on top of paper strips, make sure you cut the paper strips with a paper trimmer. The strips will lay right up against each other in an even layer, as opposed to using strips that are cut from dies.
Once I was finished with the main sentiment, I adhered the frame on top. I forgot to mention the secondary sentiment, which I had stamped in brown ink under the paper strips. If you’re wondering how I got this sentiment to be on one line, I used scissors to cut the stamp into two pieces. I love the flexibility a pair of scissors gives you in playing with sentiments!
Card 4 Supplies
Simon Says Stamp / CZ Design – Sassy Thankful Stamp Set
Simon Says Stamp – Thank You Text Background Stamp
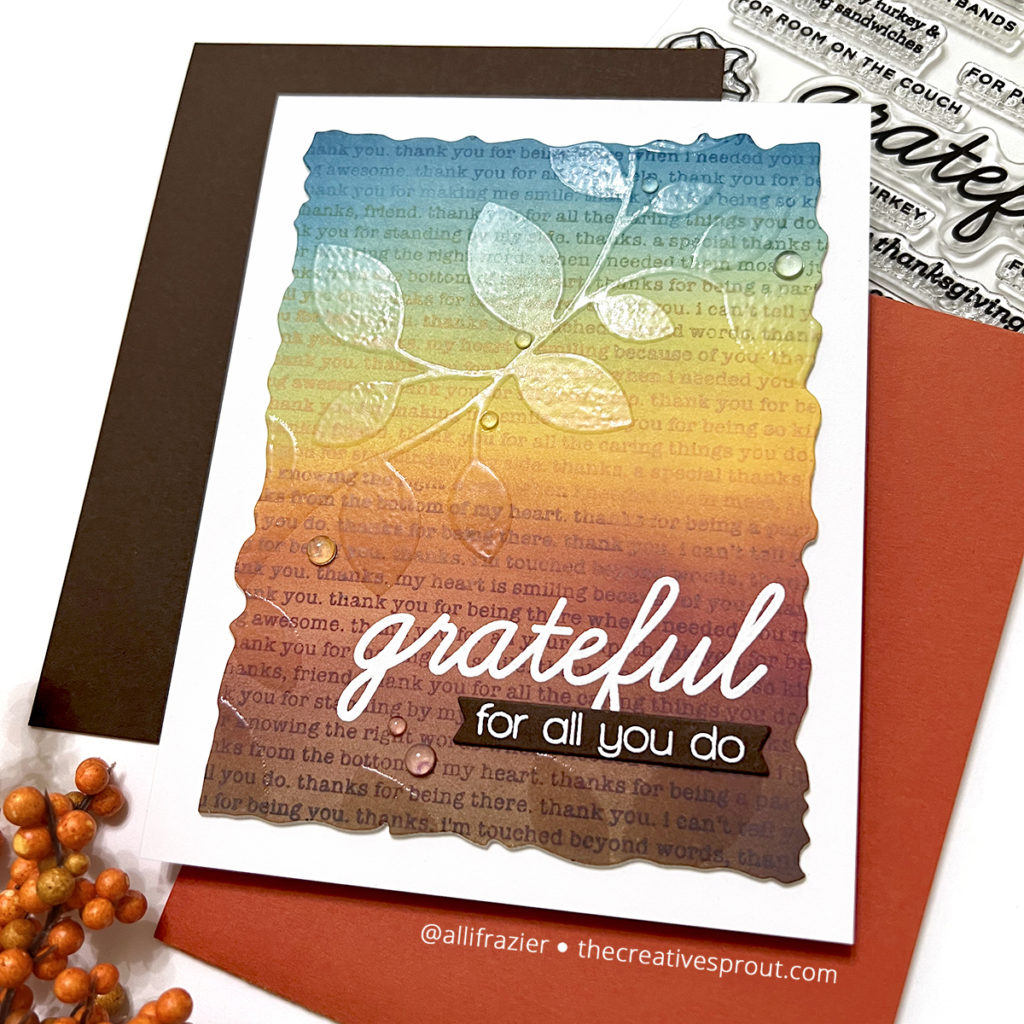
Simon Says Stamp – Leaves Stencil
Simon Says Stamp – Thanks 3×4 Stamp Set
Simon Says Stamp – Nested Banners Die Set
Waffle Flower – Deckled Frames Die Set
Tim Holtz – Distress Oxide Inks
Neenah 110 lb White Card Stock
Simon Says Stamp – Blending Brushes
Waffle Flower – Mini Stencil Mat
Memory Box – Clear Fairy Drops
Making the Fourth Card
Time for a non-sassy card! This one is definitely not clean and simple. I started by ink blending Distress Oxide inks onto a piece of white card stock. I used Unchartered Mariner, Speckled Egg, Wild Honey, Aged Mahogany, and Ground Espresso. Once I was happy with the blend, I put my panel into my MISTI. I inked up the Thank You Text Background stamp with the same inks, using just one color at a time and trying to line it up with the colors on the panel. I also used a blending brush to fade out the ink on the stamp so that I could avoid harsh lines. Once I was finished with that, I set my panel aside to completely dry.
Once dry, I white heat embossed the “grateful” sentiment onto the panel. I then took the Leaves Stencil and pressed embossing ink through the stencil onto my panel. I heat embossed the design with clear embossing powder. I used the Deckled Frames die to cut my panel. I also cut a deckled frame out of plain white card stock and stacked that behind my inked panel for dimension. After adhering it to a white A2 card base, I then heat embossed my secondary sentiment onto brown card stock. I trimmed the sentiment with one of the dies from the Nested Banners die set. To finish the card, I added several clear drops around the leaves.
Phew – that’s it for my cards! I hope they put a smile on your face. Thank you so much for visiting my blog today.
Wishing you all a crafty day,
Allison
Note: External links on my blog may contain affiliate links. This gives me the opportunity to earn a small commission when you click on the links and place an order. This comes at no additional cost to you. Thank you so much for your support, as this helps me bring you more content.

Very pretty cards. All of them are great but that last one is simply stunning.
Thank you so much! I appreciate you visiting my blog today.
I love all your cards especially the gobble til you wobble. Thanks for sharing.
Thank you so much, Lisa! I appreciate you visiting my blog today.
All of your cards are so lovely! What a great stamp set,will surely bring lots of smiles.
Thank you so much, Joanne! I appreciate you visiting my blog today.
Wonderful cards, they got me in the mood to skip Halloween and to go straight to Thanksgiving, especially that last one.
Thank you so much, Ginger. I agree, although I do love candy more than turkey! I appreciate you visiting my blog today.
Love these, the colors are so fall inspired
Thank you so much, Wendy! I appreciate you visiting my blog today.
These cards are fantastic and it makes me so happy I ordered this set! Thanks so much for the great inspiration!
Thank you so much, Vicki. I’m so happy I could inspire you! Thank you for visiting my blog today.
Such fantastic cards !
Thank you so much, Jan! I appreciate you visiting my blog today.
I love the idea of clear embossing the leaves on your last card so you can see the beautiful blended colors underneath.
Thank you so much, Marilyn! I appreciate you visiting my blog today.
Love the turkey card and the snarky thanksgiving sentiments.
Thank you so much! Those sentiments are the best, right? I appreciate you visiting my blog today.
so many wonderful and creative cards!
Thank you so much, Marianne! I appreciate you visiting my blog today.
Loved you did 4 cards. I do love the last one- Grateful for all you do! That really is a stunning card. You have a new follower
Thank you so much, Liz! And thank you for following!
I love Stamptember and especially love your Grateful card!
Thank you so much! I really appreciate you visiting my blog today.
Really Beautiful cards!!!!
Thank you so much, Maureen! I really appreciate you visiting my blog today.
Wow! I love all of your cards, but the last one….oh my!! Gorgeous! I just added that leaf stencil to my shopping cart. Thanks for sharing!
Thank you so much, Andrea! I really appreciate you visiting my blog today.
So many beautiful cards Couldn’t possibly chose between them if I had to.
Thank you so much, Sandy! I really appreciate you visiting my blog today.
Love these fall looking cards.
Thank you so much. Trina! I really appreciate you visiting my blog today.
All of your cards are beautiful, but the last one is my favorite. I have a fondness for that leaf stencil and the three dies that match it. I’m always looking for inspiration on new ways to use any of that. Your turkeys are adorable!
Thank you so much, Betty! I have a few of those leaf dies and really need to use them – thanks for the reminder! I really appreciate you visiting my blog today.
I’m always a sucker for postage stamp anything!! Love them. But that last card…..OMG. So beautiful. Lovely!!
Thank you so much! I really appreciate you visiting my blog today.
Loved all your cards. The first one – so whimsical, the second one stunning in it’s simplicity and blending, the third one, quick and easy, and the fourth one is is beautiful. Enjoyed all the different techniques and styles you used.C
Thank you so much, Cindy! I really appreciate you visiting my blog today.
Your cards are so fun and witty. Love especially the last one.
Thank you so much! I really appreciate you visiting my blog today.
Cute, sweet and funny! Love it!!
Thank you so much, Theresa! I really appreciate you visiting my blog today.
All of these are so pretty but like the fourth card best.
Thank you so much, Sandi! I really appreciate you visiting my blog today.
All of the cards are amazing, but the peeking turkeys, so cute!
Thank you so much, Diane! I really appreciate you visiting my blog today.
The turkey card is ADORABLE! You are so talented! Thanks for sharing.
Thank you so much, Natalie! I really appreciate you visiting my blog today.
I’m sure you’ve heard this a ton of times, but that peek a boo turkey is genius! It’s inspired me to use my stamps and dies with more of my foundation dies to do similar things for all kinds of stuff. Thanks
Thank you so much, Kim! I love hearing that something I made inspires others. I really appreciate your kind words.
You have created some great cards for inspiration. The colors on your fall cards make these a favorite with me.
Thank you so much, Phyllis! I really appreciate you visiting my blog today.
Your turkey card is a perfect Cathy Z example! I laughed when I saw it.
The ink blending on your fourth card is beautiful. Using the same colors on the background stamp is a great idea. Thank you for sharing it.
Thank you so much, Kelley! I mean, I had to honor Cathy in making these cards, right?! I really appreciate you visiting my blog today.
Your turkeys in the circles card inspired me to purchase the stamp set! Loved it! Thank you!
Thank you so much, Anyta! I’m so happy my card inspired you. I really appreciate you visiting my blog today.
Embossing ink through the stencil is a really neat idea that is new to me! Your cards are awesome and that last one is stunning. Thanks for the ideas!
Thank you so much, Shannon! I really appreciate your kind words.
Beautiful cards… I love that little turkey sneaking a peek through all those circles… so cute!
Thank you so much, Tiffany! I really appreciate you visiting my blog today.
Very pretty cards!!
Thank you so much, Ruth! I really appreciate you visiting my blog today.
I love this snarky Thanksgiving stamp set-I think it’s my favorite of the release! Your cards are fun-especilly the one with all of the turkeys.
Thank you so much, Linda! I agree – there’s nothing better than snarky! Makes me want to make a lot of Thanksgiving cards this year. Thanks so much for visiting my blog today.
Love all your cards. This is a great release and you have made some great creations with it. Very talented.
Thank you so much, Susan! I really appreciate you visiting my blog today.
WOW, what great inspiration! So many cards with a variety of techniques being showcased.
Thank you so much, Jackie! I really appreciate you visiting my blog today.
Beautiful cards!
Thank you so much, Melissa! I really appreciate you visiting my blog today.
Yours cards are all beautiful!💜🤗🍂🍁
Thank you so much, Gretchen! I appreciate you visiting my blog today.
Beautiful projects. Love those peeking turkeys.
Thank you so much! I appreciate you visiting my blog today.
Wow, all of your cards are beautiful and unique! I love them all.
Thank you so much, Sonya! I appreciate you visiting my blog today.
Card 1-3 made me chuckle. Love the way you used the images and sentiments!
Card 4 is beautiful. Did you use clear embossing powder to make the clear leave overlay? It is stunning!
Thank you so much, Sally! Yes, I used clear embossing powder.
Such beautiful cards. I LOVE your muted colors!!
Thank you so much, Nora! I appreciate you visiting my blog today.
Your turkeys are way too cute!
Thank you so much, Kathleen! I appreciate you visiting my blog today.
Those Oxide color choices in card four are stunning together and created such a warm inviting card!
Thank you so much, Charlotte! I appreciate you visiting my blog today.
These are all great cards. The grateful one is my favorite. The look of it is just beautiful.
Thank you so much, Golda! I appreciate you visiting my blog today.
Thank you for all the fantastic cards, Love that last one especially!!
Thank you so much, Heidi! I appreciate you visiting my blog today.
Super cute & fun 🤩… love the colours ❤️
Thank you so much, Janelle! I appreciate you visiting my blog today.
Your cards are so simple and yet so refreshingly creative.
Thank you so much, Diana! I appreciate you visiting my blog today.
Very nice cards! The turkeys on the circles are too cute!
Thank you so much, Lori! I appreciate you visiting my blog today.
Love Sassy Thankful stamp set!
It is a fun set, right? Thanks for visiting my blog today.
What delightful cards. I love the peek-a-boo turkey. Thanks for providing such great details on all your cards.
Thank you so much, Judy! I appreciate you visiting my blog today.
These are all amazing designs. Love all the fall colors.
Thank you so much, Michelle! I appreciate you visiting my blog today.
Lovely cards! All are inspiring.
Thank you so much, Susan! I appreciate you visiting my blog today.
Wow! Great job showing the versatility of this new stamp set! Love all the different looks you achieved. Thanks for the inspiration!
Thank you so much, Michele! I appreciate you visiting my blog today.
A wonderful combination of fun and gorgeous cards! Love the turkey one with all the circle cut outs and that last one is stunning!
Thank you so much, Cate. I appreciate you visiting my blog today.
Beautiful Cards, thanks for sharing with us!
Thank you so much, Sherry! I appreciate you visiting my blog today.
Fascinating! Great inspiration! Thanks so much.
Thank you so much, Candy! I appreciate you visiting my blog today.
Love these cards! Saw some of them in the LIVE today and just love them!
Thank you so much, Nicki! So glad you like the cards. Thanks for visiting my blog today.
These cards are soooooo adorable! It’s midnight here, everyone is sleeping, and I bust out laughing at Card #3!! Half the household is awake now! Not to mention our puppy! Oh well, it just shows you how wonderful these cards are! ❤️❤️❤️
Ha ha! Thank you so much, Susan! I credit the sentiments in this set for that laughter. I really appreciate you visiting my blog.
Oh my goodness I love all of your cards!!!!
Thank you so much, Mary! And thank you for visiting my blog
What an awesome release! I love so many of the products-and the designers have rocked their samples too! Love the Colors of your cards!!!!
Thanks so much, Barbara! I agree – so many great products and designers. I really appreciate you visiting my blog!
I love ALL your cards! I can’t pick a favorite. You’re making it hard for my budget by showcasing so many amazing STAMPtember releases.
Thank you so much, Kathryn! Blame Cathy Zielske for this great stamp set 🙂 I really appreciate you visiting my blog.
Great ideas for fall.
Thank you so much! And thanks for visiting my blog today.
Such gorgeous creations all! LOVE the flow through of the beautiful Autumnal shades! That ink blend in the final card is beyond delicious! Love them all xoxo
Thank you so much, Wendy. I appreciate your kind words!
All of your cards are so wonderful! I love the style you have! Thanks for the wonderful inspiration!
Thank you so much, Katherine! I appreciate you visiting my blog today.