Hello, crafty friends! Spellbinders has just released several new holiday collections today, and they are going to blow you away! I have several cards to share with you this week. Let’s start with the Gnome for Christmas Collection! This collection is full of super cute dies, new Glimmer hot foil plates, stamps, word dies, and more! All of the new collections are included in a new promotion that just started – take $20 off of a $100 purchase! With free shipping at $75 (for continental US orders), that’s an awesome deal!

Card 1 Supplies
Spellbinders – Holly Jolly Gnome Die Set
Spellbinders – Twilight Sparkle Strip Glimmer Hot Foil Plate
Spellbinders – Silver Holographic Speckle Hot Foil Roll
Spellbinders – Glimmer Hot Foil System
Making the First Card
I am a little addicted to gnomes. There, I admitted it. Needless to say, I was very excited to see this new collection! The Holly Jolly Gnome die set is the cutest ever. The top of the little string that attaches to the ornament and that the gnome holds onto is actually meant to create a swing mechanism! I had to try this for my first card, so this one very closely resembles the example that you will find on the Spellbinders website and packaging.
I started by creating my background panel. I took the new Twilight Sparkle Strip Glimmer Hot Foil Plate, and I foiled some Silver Holographic Speckle hot foil onto a panel of mint green card stock. This hot foil plate covers half of a panel, and it’s really easy to line up and foil the other half, which is what I did. I love this holographic speckle hot foil, although the full effect of it can really be seen on the negative piece, which I did hot foil using a solid hot foil plate. I just need to do something with that piece because it’s so cool! After I finished foiling my mint green panel, I then took a darker tone of green ink and ink blended around the edges to create a little bit of a glow in the middle. I mounted this panel onto a white A2 card base.
I next die cut all of the elements for the gnome, ornament and bow, using white, turquoise, mint green, and pink card stock. I also used silver card stock for the string, turquoise mirror card stock for the “holly jolly” layer of the ornament, and some gray shades of card stock for the shoes. I used Copic markers to color the nose, add shading to the hat, and add shading to parts of the bow to make them look darker, but you can also easily cut the bow from two shades of card stock to achieve a similar look.
I glued the various pieces of the bow together to make them one piece. I glued the various pieces of the ornament together, including the cap and the “string.” I glued the gnome’s hat, beard and nose together – the beard actually tucks right into a die cut slit in the hat. I also added the little gnome “body” below the beard – I think it’s the body? It’s really a little piece to add in case you can see any of it. Now, here is where everyone’s process may diverge and where I may have done things a little differently than what you’ll see others do. But who knows? Maybe we all did it the exact same way. I took the gnome and held him behind the ornament to figure out the placement of the arms and feet. I knew roughly where the hand would hold the ornament string, so I kind of started with that. Once I figured out where the main part of the head/body would sit, I glued that to the back of the ornament (making sure to glue the shoe on first, since this shoe sits behind the ornament). I then positioned the arm/hand over the ornament string, and glued the top of the arm to the beard to maintain that position. I glued the shoe over the top of the arm. Finally, I glued the second arm behind the beard to make him look like he is waving!
To create the swing mechanism, I used a foam dot that is smaller than the circle/ring that is at the top of the ornament string. I just held everything up on my card panel in order to determine where to place the foam dot. Once the dot is adhered to the panel, it’s just a matter of slipping the ornament string ring over the foam dot and then adhering the bow on top of the foam dot to hide the mechanism. Check out the video below to see the gnome in action – you can also see the shine of that holographic foil! I love it!!
Card 2 Supplies
Spellbinders – Holly Jolly Gnome Die Set
Spellbinders – Faux Stitch Embossing Folder
Spellbinders – Christmas Blooms Die Set
Spellbinders – Gold Puffy Alphabet Stickers
Spellbinders – Colorblock Landscape Die
Spellbinders – Holiday Express Die Set
Making the Second Card
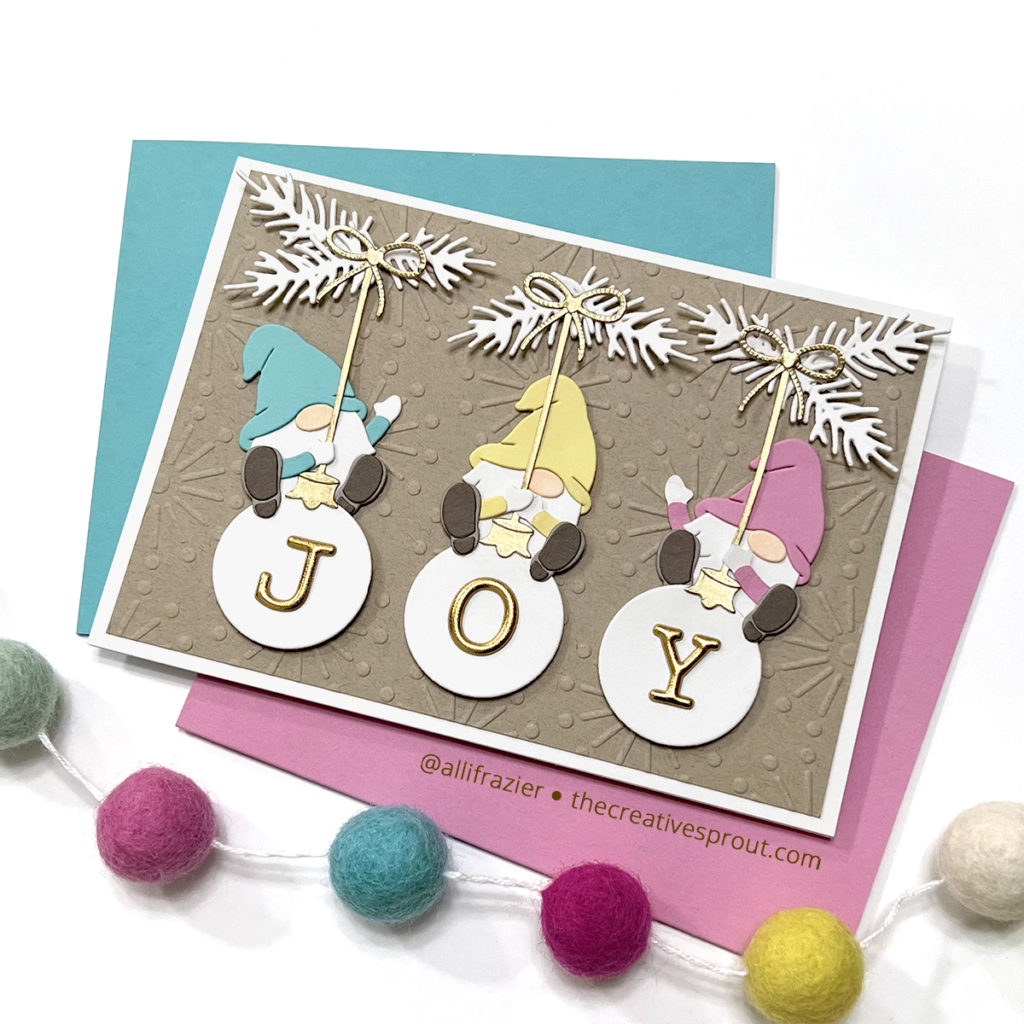
If you can have one gnome swinging from an ornament, then why not have three? Except, these little guys aren’t actually swinging – I glued them in place. And they are not happy about it.
I started this card by embossing a panel of Kraft card stock with the Faux Stitch embossing folder and then mounting the panel onto a white card base. I knew I had to make smaller ornaments, so I grabbed the circle die from my Colorblock Landscape Die die set to make these from white card stock. I think one of the great things about Spellbinders die sets is that they usually contain some very versatile pieces that can be used on all sorts of cards. So, I’m constantly looking through my sets to see what will work for what I need.
I created my gnomes in much the same way as I did for my first card. The only difference is the arms – I flipped some of the hands and arms over in order to create the gnome in the middle and the gnome on the right. Depending on the state of your die cutting plates, the back side of your die cuts may look a little rough. Sometimes, putting a clean piece of paper on top of your cutting plate before die cutting can help keep the back side of your die look cleaner. Sometimes I just run the die back through the machine, sandwiched inside of a folded piece of copy paper. I used gold card stock for the ornament strings and bows – those bows come from the new Holiday Express die set. I used the Christmas Blooms die set to cut some white pine branches to hang the ornaments from. I adhered everything to the card base with foam tape and then added the gold puffy letters to the ornaments.

Card 3 Supplies
Spellbinders – Holly Jolly Gnome Die Set
Spellbinders – Christmas Magic Glimmer Hot Foil Plate
Spellbinders – Topsy Turvy Cake Die Set
Spellbinders – Silver Hot Foil Roll
Spellbinders – Glimmer Hot Foil System
Making the Third Card
Did I already mention that I’m addicted to gnomes? I had to make a third card, of course. This card could not have been any easier – it’s just a mini slimline featuring a bunch of gnomes with different colored hats. The only part of the card that is out of the ordinary is the sentiment, if you consider hot foiled sentiments out of the ordinary. I used a sentiment from the new Christmas Magic Glimmer Hot Foil Plate set with some silver foil, and I foiled it right onto my navy card panel. To embellish my card, I used little silver die cut stars from – yep, you guessed it – the Topsy Turvy Cake die set.
I hope these cards put a smile on your face today! Be sure to check out all of the new collections from Spellbinders – there are so many amazing new holiday products. Thank you so much for visiting today. Leave a comment to let me know which card you like the best!
Wishing you all a crafty day,
Allison
Note: External links on my blog may contain affiliate links. This gives me the opportunity to earn a small commission when you click on the links and place an order. This comes at no additional cost to you. Thank you so much for your support, as this helps me bring you more content.