Hello, friends! I am so excited to share a few cards today that I made with the brand new Spring Release from La-La Land Crafts. This release is absolutely adorable and features several different sets of critter stamps, die sets, a stencil set, and of course, some amazing paper packs perfect for creating scenes.
I do plan on having a video in the next week or so, which will include a walk-through of the two new paper packs. I’ll also be creating a card with the adorable pandas from the Worry Never stamp set. Stay tuned for that!
UPDATE 5/25/25: The video is done! CLICK HERE to view on YouTube. You’ll see a new card with the adorable Pandas and the new Washi Paper Paper Pack.
NOTE: all supplies are linked in the thumbnails at the end of this blog post.
Both of my cards today feature the gorgeous new “In the City” Paper Pack. I am obsessed with this paper pack, although I am pretty sure that I say this every time there’s a new pack! I love this paper so much that I created larger cards than I normally do. Both cards are approximately 5×6. I just really wanted to get as much of this paper on a card as possible. Although I typically create A2 sized cards, I am not tied to size. If a design calls for a different size, then I go with it! And both cards will fit into a 5×7 envelope, so it works out just fine.
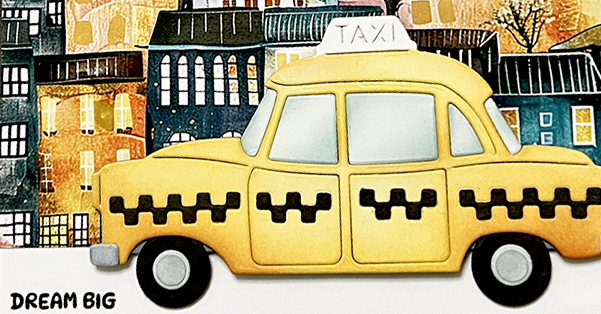
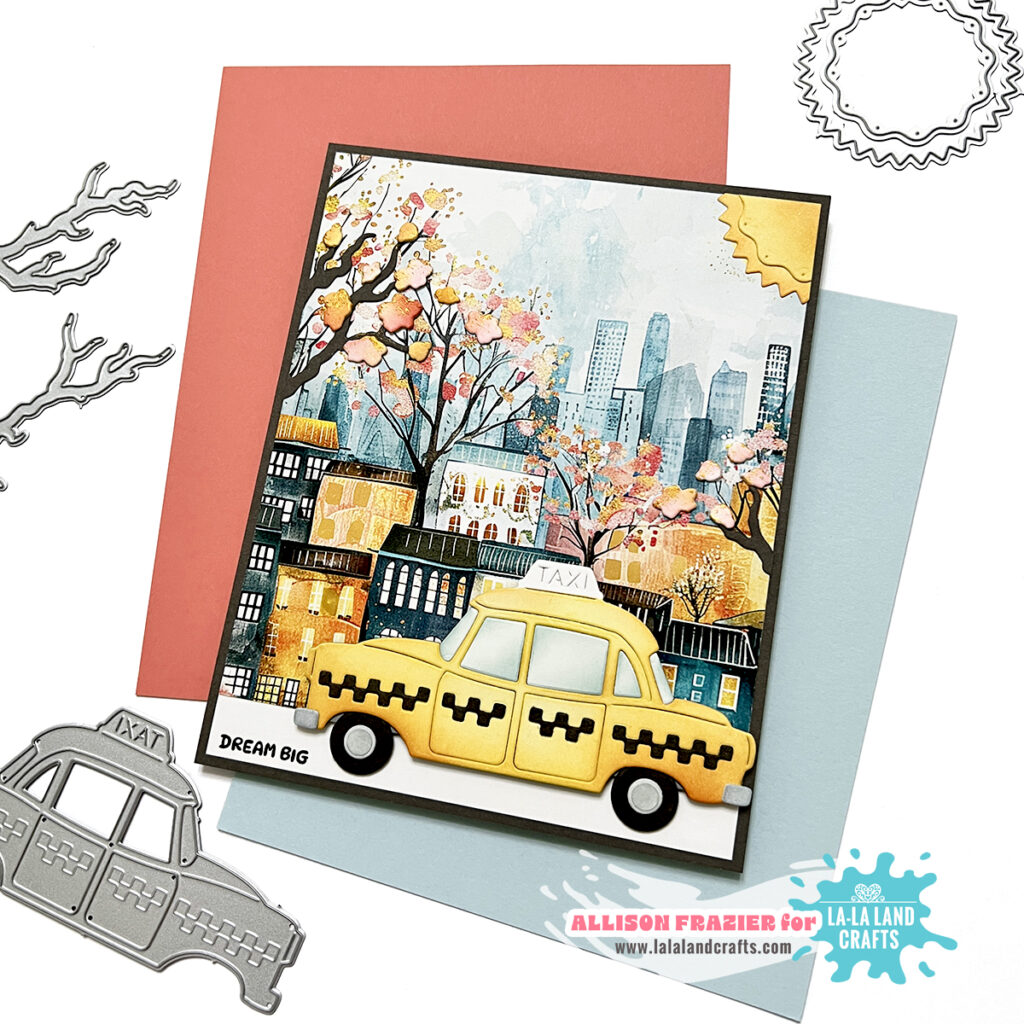
For this first card, I chose this gorgeous scene from the paper pack. I trimmed it down and glued it to a white panel, leaving part of the white panel showing at the bottom. This is where I stamped my sentiment. The “Dream Big” comes from the Worry Never stamp set that I mentioned above. The star of this card (other than the paper) is the adorable Taxicab Die. I cut all of my pieces from white card stock so that I could ink blend them. The exception is the tires, as well as the checkered design pieces, which I cut from black cardstock. I did ink blend the windows, but I think this would look really cute with vellum windows, as well. I masked off the sign on top of the taxi when I ink blended the rest of it yellow. I also added a strip of dark grey cardstock behind the tires to add my own custom detail.
I must admit that I loved the card at this point. Just simple and cute. But, there are several other dies in this release that I knew would complement this paper. In the upper right corner of this paper design, there is a sun. I decided to add in a die cut sun. I could have used a sun die, but I decided to make my own sun with a couple of the dies from the new Circle Bookplate Die Set. I love all the different shaped circles in this set! I also decided to play off of the trees that are in this paper design and add the new Cherry Blossom Dies. I cut the branches from the same dark brown paper that I used for my card base. For the flowers, I just ink blended white die cuts with various shades of pink and yellow Distress Ink. Once I glued them on the panel, though, I felt like they needed something. I decided to use some gold Lunar Paste to add a bit of texture to the flowers, and they really tie in with the paper now!

For my next card, I chose a scene from the paper pack that I wanted to highlight in a frame. The black frame is from the new Scalloped Frames Die Set. I also chose another paper that had similar color tones to the one in the frame. I used that second paper as the main card panel. I cut a bunch of little buildings with the new Skyscrapers Die Set. I cut them all from white cardstock and then colored them with various shades of Distress Ink. I tried to use similar colors as the buildings in the frame. I glued all the buildings to the bottom of the card panel, and then I added the framed image on top.
The adorable pigeon is from the new Silly Pigeons stamp set, and boy is this set aptly named! There are so many fun sentiments in this set. This little guy on my card cracks me up, and so does the sentiment that I chose. I am not a coffee drinker, but I know a lot of people who are, and I know they would love this fun card.
I colored the pigeon with my alcohol markers. I used my Copics for everything except the coffee cup. For that, I used my OLO BG7.0. Here are the Copic markers that I used:
- Head and feathers: BG75, BG72, BG10
- Eyes: YR24, Y21
- Beak: W9, W7, W5
- Body: E40, E41, E43
- Feet: YR24, YR27
- Coffee cup lid: W1, W3, W5
I hope these cards bring a smile to your face today. As always, I appreciate you visiting my blog.
Wishing you all a crafty day,
Allison
SUPPLY LIST
Note: External links on my blog may contain affiliate links. This gives me the opportunity to earn a small commission when you click on the links and place an order. This comes at no additional cost to you. Thank you so much for your support! You can see more information on my Affiliate Disclosure page.