Hello, friends. I know it’s been awhile since I’ve posted anything. I wish I could say it’s because I was having fun on vacation. But alas, my vacation quickly turned from fun to not fun, and I came home from Mexico with a fractured ankle. Boo. Today was our first full day home, and I wanted to finish these cards that I had started before we left. It is a challenge to get around my craft room. I was bouncing around from one rolling chair to another, or hopping around with my crutches! I’m going to have to figure out how to reorganize things so that I don’t have to keep getting up. If you have ever had to deal with this, I would love some pointers. Leave a comment below if you have any!
Enough about me – let’s talk about the beautiful new release from Spellbinders! There are actually several new collections for November, but I am going to focus this blog post on the Floral Reflection collection. This collection has several embossing folders, floral dies, nesting die sets, and hot foil plates.

Card 1 Supplies
Spellbinders – Essential Hearts Die Set
Spellbinders – Woodgrain Background Glimmer Hot Foil Plate
Spellbinders – Sweet Birdie Die Set
Spellbinders – Little Chickadee Die Set
Spellbinders – Yana’s Special Sentiments Hot Foil Plate and Die Set
Spellbinders – Hot Foil – Black
Spellbinders – Hot Foil – Magenta
Spellbinders – Glimmer Hot Foil System
Altenew – Enamel Embellishments
Making the First Card
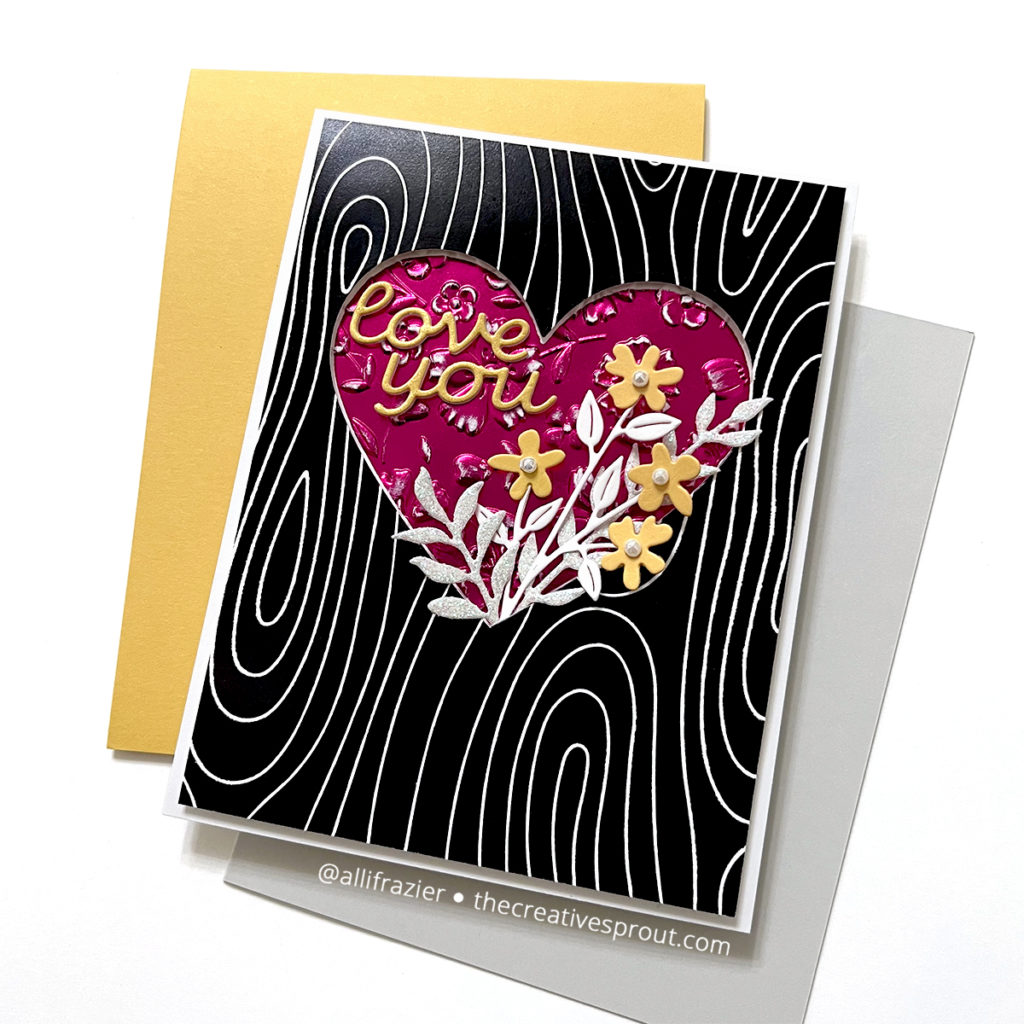
I started by hot foiling the Woodgrain Background onto white card stock with black foil. This hot foil plate was just released last month, and I am in love with it! I also used a solid hot foil plate to foil the leftover (or “negative”) piece of foil – that is how I got the heart in the center. You’ll notice how the pattern in the heart lines up with the pattern of the white background. I popped the heart up on foam tape.
I die cut the pieces for the Sweet Birdie and Little Chickadee, assembled them with liquid glue and popped those up on foam tape, arranging them so that they were each partially overlapping the heart. I hot foiled the sentiment with magenta foil and die cut it with the matching die. I finished the card with some enamel hearts.
Card 2 Supplies
Spellbinders – Essential Hearts Die Set
Spellbinders – Woodgrain Background Glimmer Hot Foil Plate
Spellbinders – Glimmer Essential Solid Heart Hot Foil Plate
Spellbinders – Flower Frenzy 3D Embossing Folder
Spellbinders – Sealed Wildflowers Die Set
Spellbinders – Layered Mix & Match Sentiments Die Set
Spellbinders – Hot Foil – Black
Spellbinders – Hot Foil – Magenta
Spellbinders – Glimmer Hot Foil System
Making the Second Card
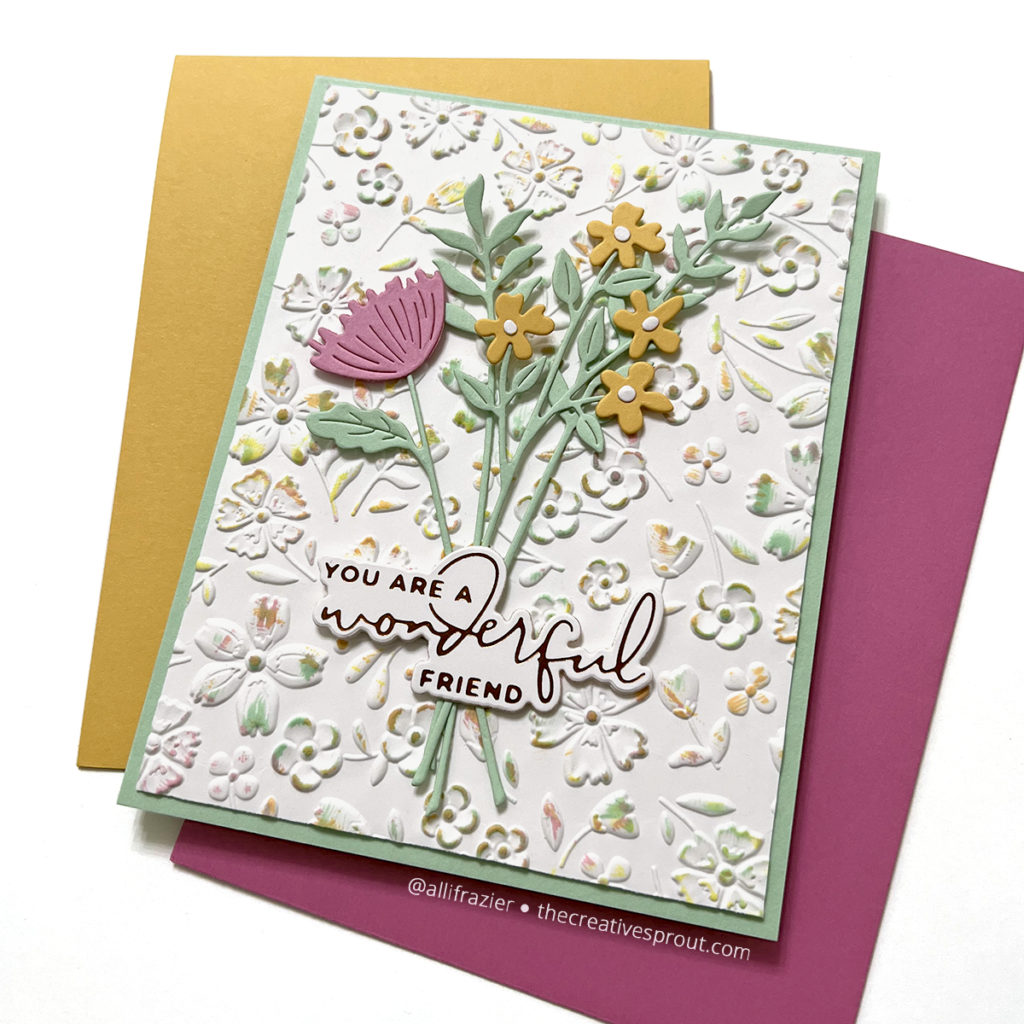
The background for this card is the reverse foil Woodgrain Background that I made at the same time as my first card. The heart on the first card was actually cut from this card panel. For the inside of the resulting heart “window”, I foiled the new solid heart hot foil plate with magenta foil onto white card stock. I then took that card stock panel and ran it through my Platinum 6 inside the new Flower Frenzy 3d embossing folder. After removing the panel from the embossing folder, I took a sanding block and roughed up the edges of the embossed floral design – this exposes the white core of the paper. I added foam tape to the back of the black panel, lined it up with the magenta hot foiled (and embossed) heart, and mounted it onto a white A2 card base.
I used the new Sealed Wildflowers die set to cut some leaves out of white and white glitter card stock and some flowers out of yellow card stock. I arranged those along the right side of the heart opening and then adhered my sentiment die cuts inside the heart. I finished the card by adding some pearl dots to the centers of my flowers.
Card 3 Supplies
Spellbinders – Flower Frenzy 3D Embossing Folder
Spellbinders – Sealed Wildflowers Die Set
Spellbinders – Yana’s Special Sentiments Hot Foil Plate and Die Set
Spellbinders – Hot Foil – Polished Brass
Spellbinders – Glimmer Hot Foil System
Making the Third Card
This card was really easy and fast to make, and who doesn’t like that once in awhile, right?? I embossed a white piece of card stock with the Flower Frenzy 3D embossing folder. I then swiped ink cubes that happened to be on my desk over the raised floral pattern. I used green, yellow, orange, and pink inks. I die cut some leaves and flowers in complementary colors using the Sealed Wildflowers die set.

I foiled the sentiment with polished brass foil, cut it with the matching die and adhered that to two layers that I had cut out of plain white card stock. I then adhered the stacked sentiment over the bundle of wildflowers on the card panel.
I love how all of these cards turned out, but not as much as I love the fact that I was actually able to complete them! I hope these cards put a smile on your face. Be sure to check out all of the new goodies on the Spellbinders website. What is on my wish list? The new postage edge nesting die sets! Thank you so much for stopping by today.
Wishing you all a crafty day,
Allison
Note: External links on my blog may contain affiliate links. This gives me the opportunity to earn a small commission when you click on the links and place an order. This comes at no additional cost to you. Thank you so much for your support, as this helps me bring you more content.