Hello, Friends! I am back to share another new Spellbinders holiday collection that was just released –Tinsel Time Collection. Just like the Gnome for Christmas collection that I introduced in my last post, Tinsel Time is also full of super cute dies, new Glimmer hot foil plates, stamps, word dies, and more! And best of all, these new collections are included in a new promotion that just started – take $20 off of a $100 purchase! With free shipping at $75 (for continental US orders), that’s an awesome deal!
Card 1 Supplies
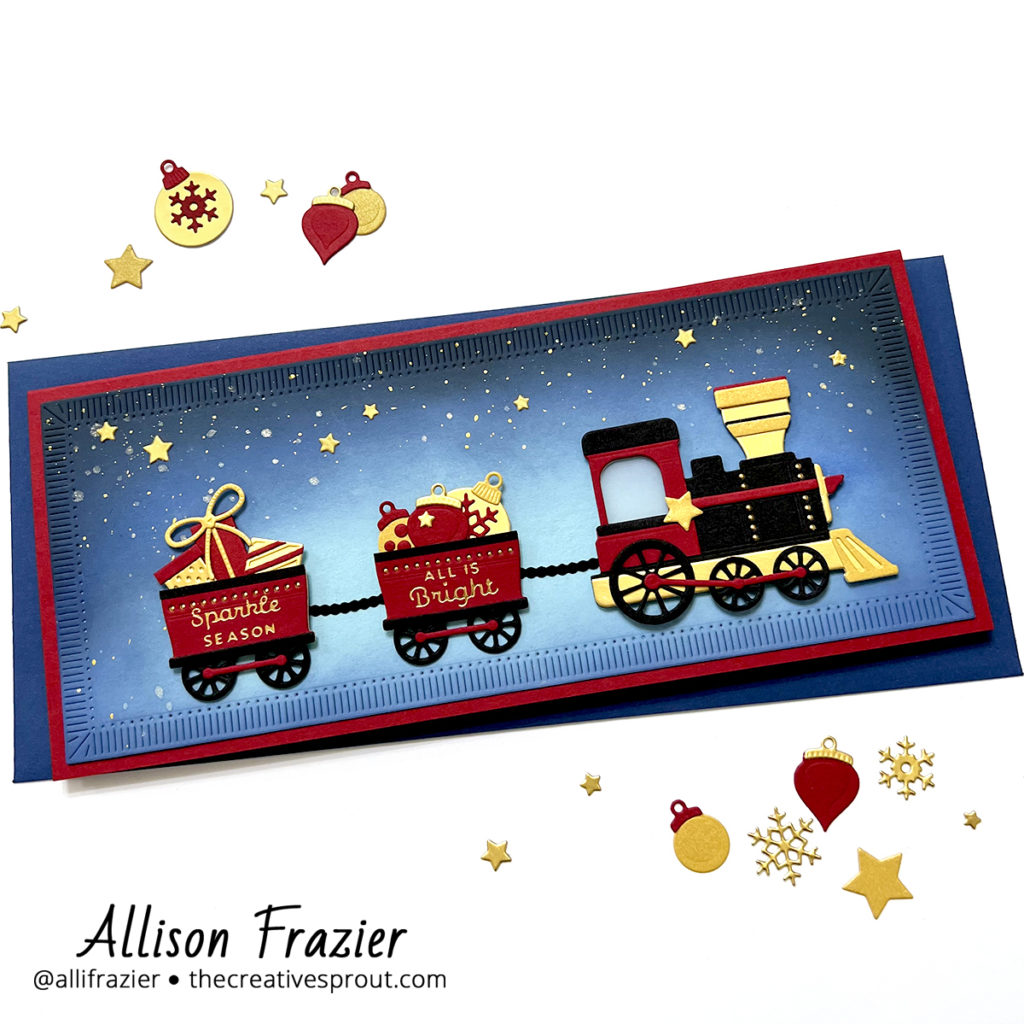
Spellbinders – Holiday Express Die Set
Spellbinders – Christmas Magic Glimmer Hot Foil Plate
Spellbinders – Holiday Decorations Die Set
Spellbinders – Topsy Turvy Cake Die Set
Spellbinders – Fluted Classics Slimline Die Set
Spellbinders – Gold Hot Foil Roll
Spellbinders – Glimmer Hot Foil System
Tim Holtz – Distress Oxide Ink
Making the First Card
My first card features the fun Holiday Express Die Set. This set helps you create a train, with an engine and a car. As you can see, I made two cars so that I could fill a slimline card. I could have easily added another car, as well! You can make your train look really cutesy, using pastel colors or you could make it look more Christmasy, using reds and greens. I’m a big Harry Potter fan, so when I see trains, I immediately think of the Hogwarts Express! So, that’s where my color inspiration came from.
I started by die cutting the slimline panel from light blue card stock using the Fluted Classics Slimline Die Set. I then used Distress Oxide inks in darker shades of blue to ink blend around the edges, going heavier at the top to create a nighttime sky. I kept the middle fairly light, in order to create a glow effect. I also used black ink to really darken up the top edge. Spellbinders now sells Distress Oxide Inks, which I think is great because who doesn’t like having a one-stop shop for everything? Once I was finished with my panel, I set it aside to dry.
I next die cut all of the elements for the train. For some elements, like the engine, I cut each element from several different colors of card stock so that I could cut and layer different parts for more detail. For example, I cut the big engine piece from gold, black and red. I used the gold as the base layer, then I cut the chimney off the black piece and glued that on top of the gold layer. Then I cut everything but the back part of the engine off of the red piece and glued that on top of the black. You definitely do NOT need to do this. There are many die pieces included in this set to add all sorts of details to your train. Let’s just say I went a little bit above and beyond!
I don’t really have a main sentiment for this card, as I was really just going for a pretty scene. Instead, I picked a couple sentiments from the new Christmas Magic Glimmer Hot Foil Plate set that would fit on the little train cars. I used gold foil on red card stock and ran that through my Glimmer Hot Foil System before die cutting those cars. If you don’t have a hot foil machine, there is also a new stamp set that has similar sentiments.
The die set includes small dies to create presents and ornaments to fill your train cars. I did use those all of those pieces. But, I did add on to that in order to create a few different ornaments. I used the Holiday Decorations die set to create a couple different sized ornaments to put in the car. I also used a snowflake die from that set to put on the big ornament, as well as a star die to put on the train engine. As for the small stars in the sky, those come from the Topsy Turvy Cake die set. And those little red dots on the gold ornament? Also from the Topsy Turvy Cake set! I tell you, I use that die set for embellishments all of the time! Oh, and I almost forgot. Can you spot what else comes from that Topsy Turvy Cake set? The black chains that connect the cars to each other and to the engine – those were cut from the dies that you normally use to make the little beaded frosting detail on the cake!

Card 2 Supplies
Spellbinders – Holiday Group Hug Stamp
Spellbinders – Create a Christmas Sentiment Die Set
Spellbinders – Everyday Sentiments II Hot Foil Plate & Die Set
Spellbinders – Mini Christmas Sentiment Strips Glimmer Hot Foil & Die Set
Making the Second Card
My second card is more clean and simple, to say the least! Can you get any simpler than not coloring a stamp like this? I have made a lot of cards in the past with big floral stamps, where I didn’t color them, and they turned out pretty cool. This may be the first time I have tried something similar with characters. I started by stamping this cute group onto white card stock with black ink. I then fussy cut it out.
There are many dies out there that you can buy to cut paper strips of different widths. The great thing about some of Spellbinders’ various Glimmer hot plate sentiment sets is that they include one long die to cut the sentiments out. And that is what I used to create my strips. The wider strip is from the Everyday Sentiments II set, and the narrower strip is from the Mini Christmas Sentiment set. I cut the smallest yellowish-green strip with my paper cutter. I lined my strips up at an angle and glued them to a dark gray A2 card base.
I used the “merry” die from the Create a Christmas Sentiment die set and cut it from three different colors of card stock (which match the paper strips). I glued these along the top of the card, trying to follow the same angle as the paper strips. I then adhered my stamped image to the panel with foam tape. I didn’t really plan it, but as I was putting the stamp set away, I saw the “the more, the merrier” sentiment, and I thought it was fitting, since I had just glued several merry’s to the card! So, I white heat embossed this on the panel right above the red strip. I had thought about coloring a very small element on each character, like the berries on Mrs. Claus’s hat, the hat on the bear, etc. But, the only color on Santa would have been a LOT of red for either the hat or the coat. And I really just wanted to keep it clean. I did use a black glaze gel pen to add some life to each of their eyes, as well as the bear’s nose. It may be hard to see in the picture, but this pen really makes a difference – it adds the slightest dimension and shine. I covered the hearts on the snowman with some enamel heart stickers from my stash. And finally, I glued a tiny red pom pom to Rudolph’s nose.
I hope these cards put a smile on your face today! Be sure to check out the new collections from Spellbinders – there are so many fun new products…and more to come! Thank you so much for visiting today – I always appreciate you stopping by.
Wishing you all a crafty day,
Allison
Note: External links on my blog may contain affiliate links. This gives me the opportunity to earn a small commission when you click on the links and place an order. This comes at no additional cost to you. Thank you so much for your support, as this helps me bring you more content.