Hello, Friends! Today I am sharing a fun and addicting stencil technique that I had nothing to do with coming up with! Like most people in the card making world, I watch a lot of Jennifer McGuire videos. She recently posted a video on YouTube showing this technique, and although I tend to save these ideas for later, I immediately went to task and made a LOT of cards. Click here to view Jennifer’s video – she demonstrates this technique so well.
Card 1 Supplies
The Stamp Market – Gorgeous Greetings
The Stamp Market – Gorgeous Greetings Dies
The Stamp Market – Tiled Tulip Stencils (Retired)
Pinkfresh Studio – Raspberry Bliss Dye Ink
Pinkfresh Studio – Sparkling Rose Dye Ink
Gina K. Designs – Sea Glass Dye Ink
Gina K. Designs – Turquoise Sea Dye Ink
Gina K Designs – Tranquil Teal Dye Ink
MFT – Aim for the Clouds Stamp Set (Retired)
Making the Card
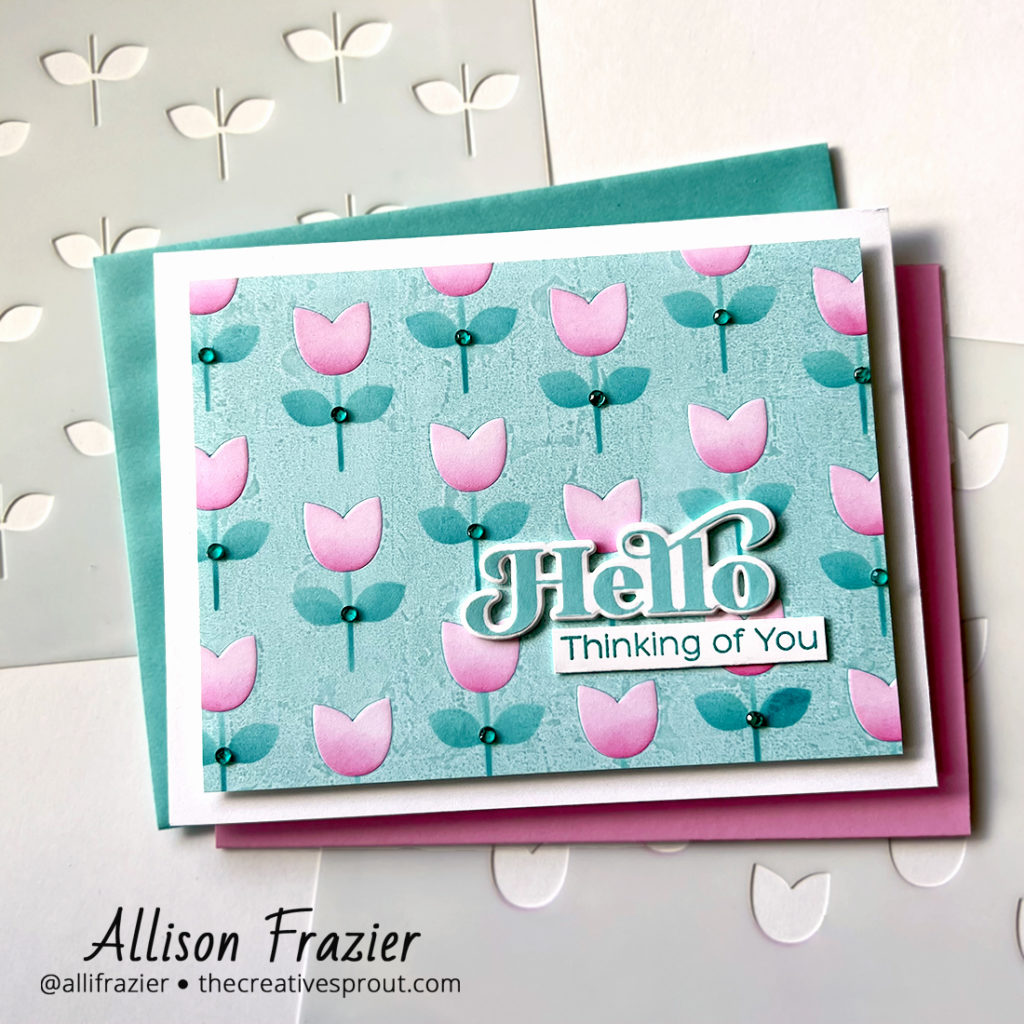
Following Jennifer’s technique, I taped the stencil with the tulip shape to a white piece of card stock, creating a hinge. I inked up the stencil with the Sea Glass Ink, closed the hinge, and then ran this through my Platinum 6 with the embossing mat and plate. The ink looked a bit splotchy, so I re-inked the stencil and ran it through again. It still looks splotchy, but I kind of like the effect. I think part of the issue is that, when I ran the brayer over the tulip pattern, the pattern kind of transfers to the brayer itself. You can kind of see a faint tulip shape on the upper left part of the card. Moving on – I inked up the tulip stencil the “normal” way with the two pink inks. I then inked up the leaf stencil with the two darker blue inks.

I am really loving these Gorgeous Greetings sentiments from The Stamp Market. And I apologize, but it seems that these tulip stencils are no longer on their website – boo! They have a lot of other fun layering stencil sets, though.

Card 2 Supplies
Pinkfresh Studio – Argyle Layering Stencils
MFT – All About You Stamp Set (Retired)
MFT – Love You Dienamics (Retired)
Pinkfresh Studio – Sky Blue Dye Ink
Pinkfresh Studio – Clementine Dye Ink
Gina K. Designs – Turquoise Sea Dye Ink
Altenew – Cool Summer Night Enamel Dots
Making the Card
For this card, I inked up the stencil with the large diamond pattern with the Sky Blue Ink, closed the hinge, and ran this through my Platinum 6 with the embossing mat and plate. I then inked up the stencil the “normal” way with the Clementine ink. I used the Turquoise Sea ink for the second stencil.
Eek – more retired products from MFT! I have so many products from them that I consider to be staples in my stash, so I apologize for using them. But, I’m not going to get rid of them. There are, however, plenty of alternatives for what I used. The “YOU” letters are almost identical to MFT’s Impact Alphabet Die-namics. It appears that MFT has an updated stamp set that is also called “All About You.” It doesn’t have the sentiment that I used, but it has some other good ones. Why oh why do stamps and dies get retired so often? I mean, I get it. But…sigh.

Card 3 Supplies
Simon Says Stamp – Flora Stencil
Gina K. Designs – Applemint Dye Ink
Gina K. Designs – Turquoise Sea Dye Ink
Honey Bee Stamps – Clear Gem Stickers
Making the Card
In my opinion, Card 3 shows where this technique really shines. I have several really dainty stencils that I don’t reach for very often because, well, they’re dainty. But using this technique is really easy because all you have to do is brayer the ink onto the solid part of the stencil. Once you run it through the die cutting machine, it creates this very cool letterpress look. After creating this look with the Turquoise Sea ink, I then inked over the entire panel with the Applemint Ink. I then went back in with the Turquoise Sea ink to give the petals more dimension.

It’s hard to see the shine in the first picture, but I used my Wink of Stella pen to add some sparkle to parts of the petals. I also added sparkle to the “Hugs” diecut. To finish the card, I added some clear gems to the parts of the design that had little circles coming off of the stems. I really love how this card turned out.
Card 4 Supplies
Picket Fence Studios Stencil
Altenew – Sentiment Strips 3 Stamp Set
Distress Inks (Regular and Oxide)
MFT – Skinny Strips Die-namics
Studio Katia – Gold Foil Pearls
Studio Katia – Embellishment Wand
Making the Card
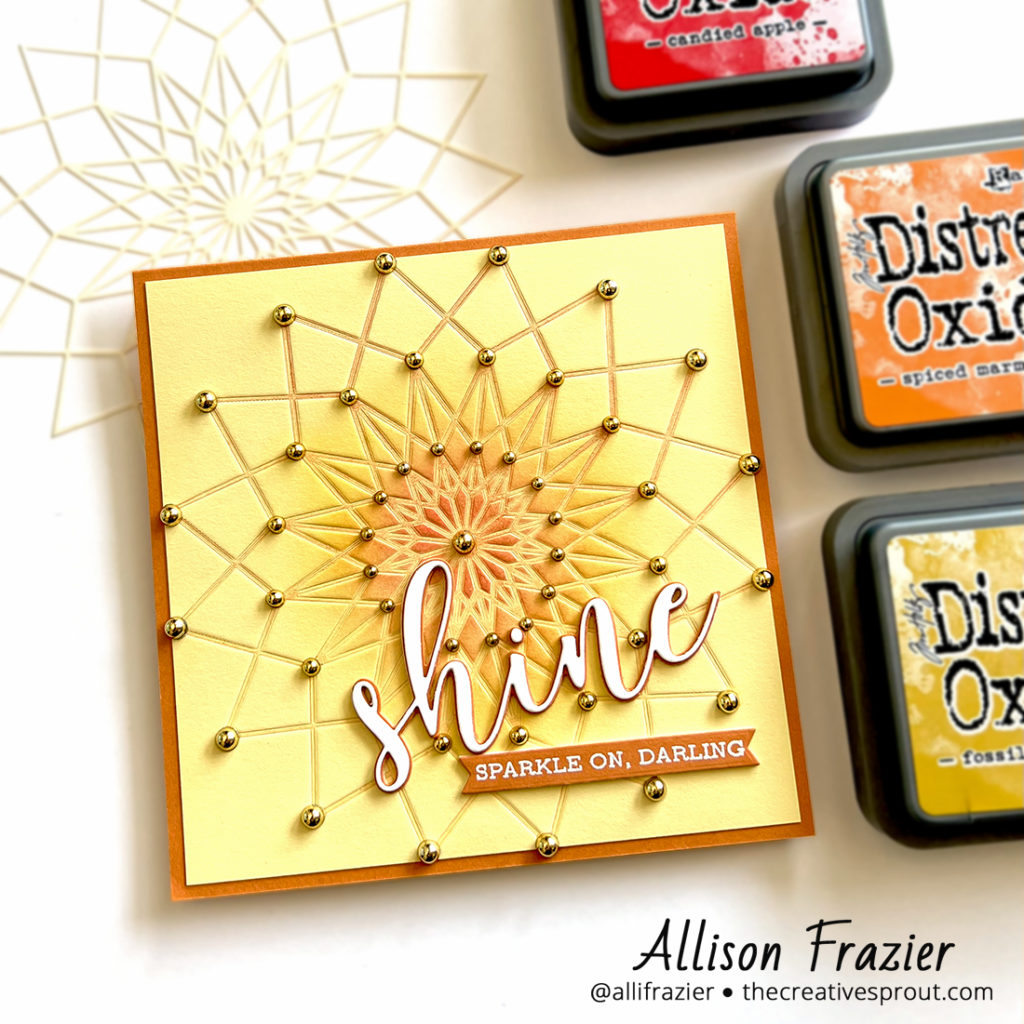
After the third card, I wanted to try one of the most delicate stencils in my stash. Unfortunately, I have no idea what the name of it is! I don’t see it on the Picket Fence website – this may have been sent to me as a free gift when I bought other stuff from them? You can see the stencil in the picture – I’m sure there are plenty of similarly dainty stencils from other brands. Anyway, I decided to use Distress Oxides for inking up the stencil because I was starting with a yellow piece of card stock. I used a combination of Fossilized Amber, Spiced Marmalade and Candied Apple. I ended up using more red and orange and sending it through my machine a second time. Again, this created a really cool letterpress look. I then took corresponding colors of regular Distress Ink and lightly blended the colors into the design, starting with the red in the center. I was careful not to blend color outside of the design.
To glam this card up, I added a bunch of gold pearls. By the way, if you’re having trouble picking up jewels and adding them to your cards, I highly recommend Studio Katia’s Embellishment Wand. I have had nothing but luck with this ever since I purchased it a few years ago.
I can’t remember the last time I created so many cards in one day. This technique is very addicting. I really could have kept going with all of my stencils! But then I would probably just end up discovering that a bunch of those are retired, too – ha! Thank you, Jennifer McGuire!
Wishing you all a crafty day!
Allison
Note: External links on my blog may contain affiliate links. This gives me the opportunity to earn a small commission when you click on the links and place an order. This comes at no additional cost to you. Thank you so much for your support, as this helps me bring you more content.